
Is your Roomba making an annoying squeaking sound? A squeaky Roomba can be disruptive and indicate underlying problems. This article will guide you through diagnosing and fixing the most common causes of a squeaking Roomba, helping you restore it to quiet, efficient cleaning.
A squeaking Roomba can be more than just an annoyance. It often signals that something isn’t working correctly, whether it’s a buildup of debris, a worn-out component, or a need for lubrication. Ignoring the squeak could lead to further damage and costly repairs down the road. This guide provides step-by-step instructions to identify the source of the squeak and implement effective solutions. From simple cleaning to more involved repairs, we’ll cover everything you need to know to get your Roomba running smoothly and quietly again.
This article will cover common causes of Roomba squeaking, such as dirty brushes, axles, or wheels. We’ll also provide solutions such as cleaning, lubricating, and replacing worn parts. By the end of this guide, you’ll have the knowledge and confidence to troubleshoot and resolve your Roomba’s squeaking issue, ensuring it continues to keep your floors clean without the irritating noise.
Identifying the Source of the Squeak
Pinpointing the source of the squeak is the first step in resolving the issue. The squeak’s location and timing can provide clues about the problem.
- Listen Carefully: Pay close attention to when the squeak occurs. Does it happen constantly, only when moving, or during specific actions like turning?
- Observe the Roomba: Watch your Roomba in action. Can you visually identify which part is causing the noise?
- Isolate the Area: Try to narrow down the location of the squeak. Is it coming from the brush area, the wheels, or elsewhere?
Cleaning the Brushes and Brush Housing
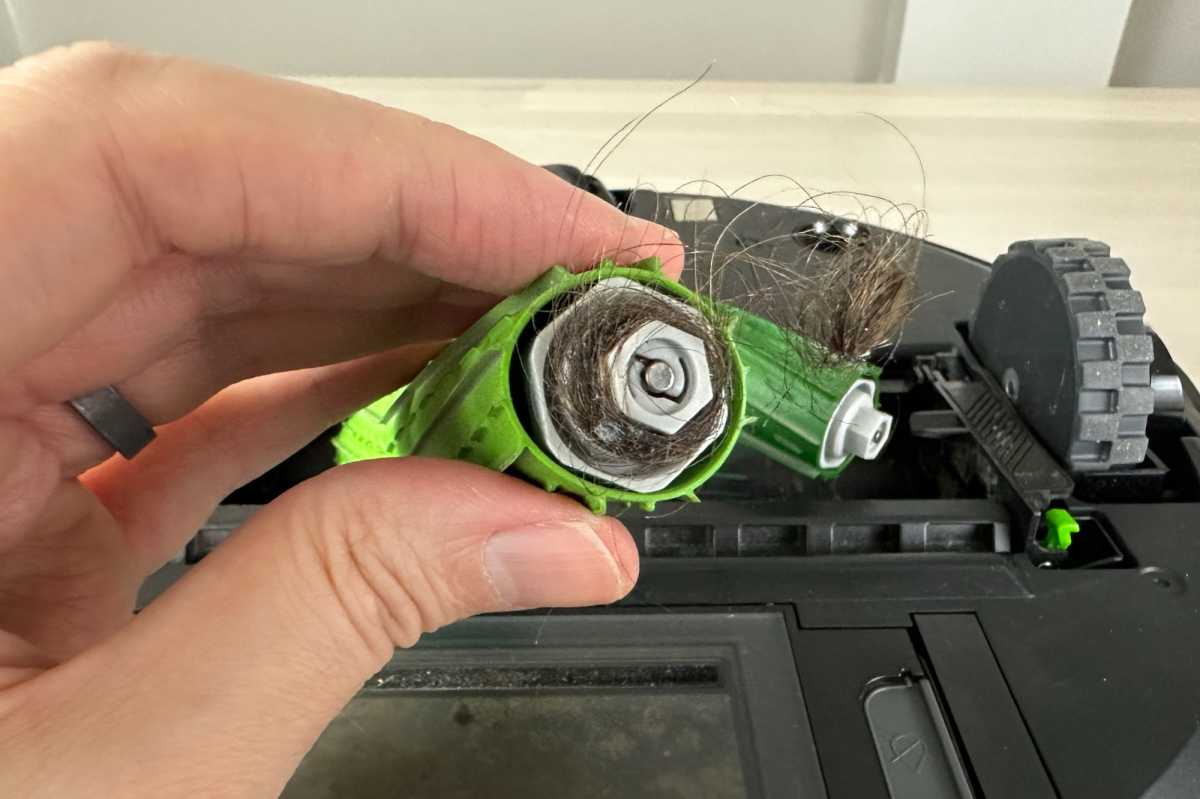
Dirty brushes are a frequent cause of Roomba squeaking. Hair, dust, and debris can accumulate around the brushes and their axles, creating friction and noise.
- Remove the Brushes: Turn off your Roomba and remove the brush guard. Take out both the main brush and the side brush.
- Clean the Brushes: Remove any visible hair, threads, or debris from the brushes. Use a cleaning tool or your fingers to pull off.
- Clean the Brush Axles: Inspect the axles where the brushes attach. Clean away any accumulated debris using a small brush or a cloth.
- Clean the Brush Housing: Wipe down the inside of the brush housing to remove any loose dirt or dust.
- Reassemble: Reinstall the brushes and brush guard, ensuring they are securely in place.
Addressing Wheel Squeaks

The wheels are another common source of squeaking in Roombas. Dirt and debris can get lodged in the wheel mechanism, causing friction and noise.
- Inspect the Wheels: Examine each wheel for any visible obstructions or buildup.
- Remove the Wheels: Depending on your Roomba model, you may be able to remove the wheels for easier cleaning. Consult your Roomba’s manual for instructions.
- Clean the Wheel Axles: Clean the wheel axles and the surrounding area with a small brush or cloth.
- Remove Debris: Use tweezers or a small tool to remove any lodged debris from the wheel mechanism.
- Reassemble: Reinstall the wheels, ensuring they rotate freely.
Lubricating Moving Parts
Sometimes, squeaking is caused by a lack of lubrication. Applying a small amount of lubricant to the moving parts can help reduce friction and eliminate noise.
- Identify Friction Points: Determine which parts are rubbing together and causing the squeak. Common areas include the brush axles, wheel axles, and any other moving joints.
- Apply Lubricant: Use a silicone-based lubricant. Apply a small amount to the identified friction points. Avoid using oil-based lubricants, as they can attract dust and dirt.
- Test the Roomba: Turn on your Roomba and observe if the squeaking has stopped. If not, reapply lubricant or investigate other potential causes.
Checking and Replacing Worn Parts

If cleaning and lubrication don’t solve the problem, worn parts may be the culprit. Over time, certain components can wear down and cause squeaking.
- Inspect the Brushes: Check the brushes for signs of wear, such as frayed bristles or damaged rubber parts. Replace the brushes if they are worn.
- Inspect the Wheels: Examine the wheels for cracks, deformities, or excessive wear. Replace the wheels if necessary.
- Check the Motor: If the squeaking persists and seems to be coming from the motor area, the motor may be failing. Consider replacing the motor or contacting Roomba customer support.
Troubleshooting Guide
Here are some common Roomba squeaking problems and their solutions:
- Problem: Squeaking only occurs when the Roomba is moving.\
Solution: Clean the wheels and wheel axles. Lubricate the axles if necessary. - Problem: Squeaking is constant and loud.\
Solution: Check the brushes and brush housing for excessive debris buildup. Clean thoroughly. - Problem: Squeaking started after replacing a part.\
Solution: Ensure the replacement part is compatible with your Roomba model and is installed correctly. - Problem: Squeaking is intermittent.\
Solution: Inspect all moving parts for looseness or damage. Tighten screws or replace worn parts. - Problem: Squeaking persists after cleaning and lubricating.\
Solution: The motor may be failing. Contact Roomba customer support or consider replacing the Roomba.
Pro Tips for Preventing Roomba Squeaks
- Regular Cleaning: Clean your Roomba’s brushes, wheels, and dustbin regularly to prevent debris buildup.
- Lubrication: Periodically lubricate the moving parts to reduce friction and noise.
- Replace Worn Parts: Replace worn brushes and wheels promptly to maintain optimal performance and prevent squeaking.
- Monitor Performance: Pay attention to any changes in your Roomba’s performance, such as unusual noises or reduced cleaning efficiency.
- Proper Storage: Store your Roomba in a clean, dry place to prevent dust and debris from accumulating.
FAQ
Why is my Roomba squeaking even after I cleaned it?
Even after cleaning, some debris might be trapped in hard-to-reach areas. Double-check the brush axles and wheel mechanisms, using a small tool to dislodge any remaining dirt. Also, consider lubricating the moving parts to reduce friction.
How often should I clean my Roomba to prevent squeaking?
Ideally, you should clean the brushes and dustbin after each use. A more thorough cleaning, including the wheels and brush housing, should be done weekly. This regular maintenance will help prevent debris buildup and reduce the likelihood of squeaking.
What type of lubricant is safe to use on my Roomba?
Use a silicone-based lubricant, as it is safe for plastic and rubber components and won’t attract dust and dirt like oil-based lubricants. Apply a small amount to the brush axles, wheel axles, and other moving joints.
Can a full dustbin cause my Roomba to squeak?
While a full dustbin doesn’t directly cause squeaking, it can put extra strain on the motor and other components, which might indirectly lead to squeaking. Empty the dustbin regularly to ensure smooth operation.
Is it normal for a new Roomba to squeak?
A new Roomba should not squeak. If you notice squeaking in a new Roomba, it could be a manufacturing defect. Contact Roomba customer support for assistance or a replacement.
When should I consider replacing my Roomba instead of trying to fix the squeaking?
If the squeaking persists after thorough cleaning, lubrication, and replacement of worn parts, the motor or other internal components may be failing. If your Roomba is old or has other performance issues, it might be more cost-effective to replace it.
Tips, Warnings, and Best Practices
- Safety First: Always turn off and unplug your Roomba before performing any maintenance or repairs.
- Use the Right Tools: Use appropriate cleaning tools, such as small brushes and tweezers, to avoid damaging delicate components.
- Don’t Over-Lubricate: Applying too much lubricant can attract dust and dirt, making the problem worse. Use a small amount and wipe off any excess.
- Consult the Manual: Refer to your Roomba’s manual for specific instructions and recommendations for your model.
- Be Gentle: When removing and reassembling parts, be gentle to avoid damaging them.
Conclusion
A squeaking Roomba can be a nuisance, but with the right knowledge and tools, you can often resolve the issue yourself. By identifying the source of the squeak, cleaning and lubricating the moving parts, and replacing worn components, you can restore your Roomba to quiet, efficient operation.
Regular maintenance and preventative measures will help keep your Roomba running smoothly for years to come. If you’ve tried these solutions and your Roomba is still squeaking, consider contacting Roomba customer support or exploring replacement options to keep your floors clean without the irritating noise.