
Is your iRobot Roomba i3 acting up? It’s frustrating when your robotic vacuum cleaner stops working, leaving you with the chore you were trying to avoid. This guide will walk you through the most common reasons why your Roomba i3 might not be working and provide step-by-step solutions to get it back in action.
We’ll cover everything from basic troubleshooting steps to more advanced fixes, ensuring you can diagnose and resolve the issue efficiently. Whether your Roomba is struggling to charge, experiencing navigation problems, or simply refusing to turn on, this article provides the knowledge to get your Roomba i3 working like new again.
Common Reasons Why Your Roomba i3 Isn’t Working
There are several reasons why your Roomba i3 might be malfunctioning. Identifying the root cause is the first step to fixing the problem. Here are some of the most common issues:
- Battery Problems: The Roomba’s battery may be dead, damaged, or not properly connected.
- Charging Issues: The charging base might not be working, or the Roomba isn’t making proper contact.
- Navigation Errors: Sensors may be dirty or malfunctioning, causing the Roomba to get stuck or wander aimlessly.
- Software Glitches: Temporary software bugs can sometimes disrupt normal operation.
- Physical Obstructions: Debris, hair, or other obstructions can clog the brushes and wheels.
Initial Troubleshooting Steps for Your Roomba i3
Before diving into more complex solutions, try these simple fixes first:
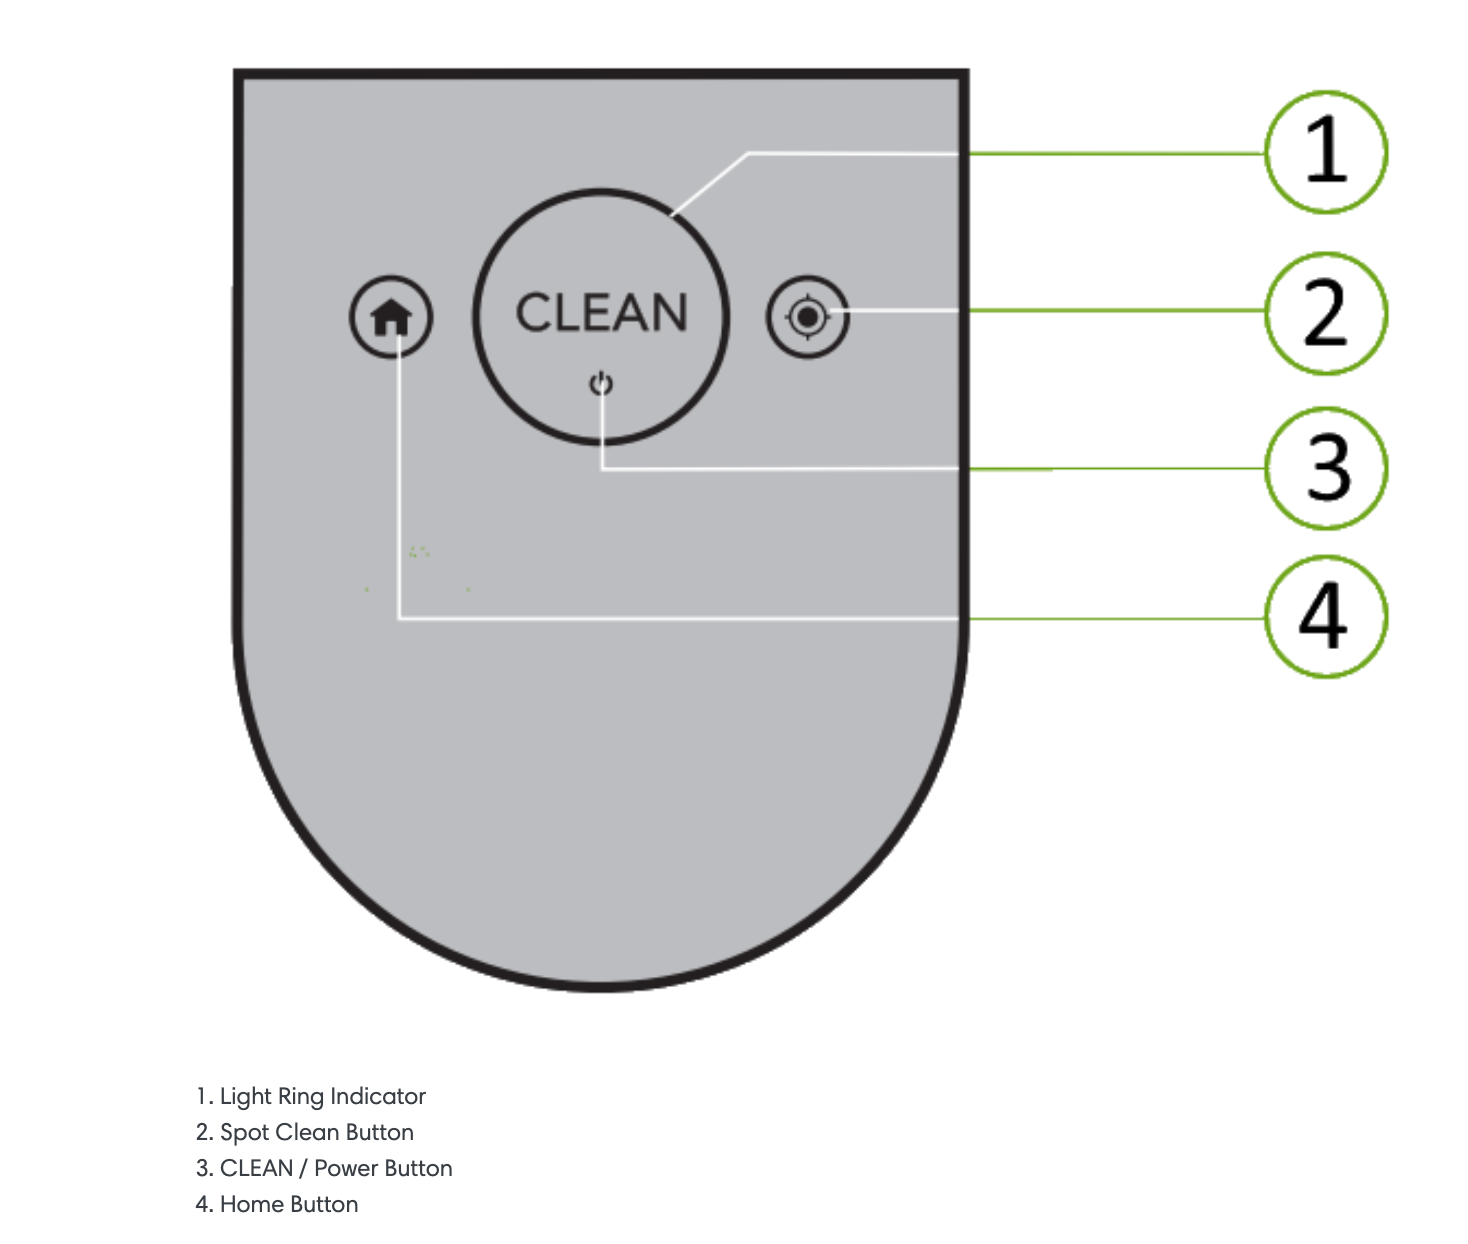
- Restart the Roomba: A simple restart can often resolve minor software glitches. Press and hold the “Clean” button for about 20 seconds until the light ring around the button illuminates white, then release.
- Clean the Roomba: Regularly clean the brushes, wheels, and sensors. Use a soft, dry cloth to wipe down the sensors and remove any debris from the brushes and wheels.
- Check the Charging Station: Ensure the charging station is plugged in and that the Roomba is properly docked. The charging indicator light should be illuminated.
- Inspect for Obstructions: Check for any obstructions that might be preventing the Roomba from moving freely. This includes cords, rugs, or other objects that the Roomba might be getting stuck on.
Diagnosing and Fixing Battery Issues
A faulty battery is a common culprit when your Roomba i3 isn’t working. Here’s how to diagnose and address battery problems:
Checking the Battery’s Condition
- Inspect for Damage: Look for any signs of physical damage to the battery, such as swelling or leaks.
- Test the Battery: If you have a multimeter, you can test the battery’s voltage. A fully charged Roomba i3 battery should read around 14-16 volts. If the voltage is significantly lower, the battery may need to be replaced.
Replacing the Battery
- Purchase a New Battery: Buy a replacement battery specifically designed for the Roomba i3. You can find these online or at appliance stores.
- Install the New Battery: Follow the manufacturer’s instructions to replace the battery. Typically, this involves removing a few screws and swapping out the old battery with the new one.
Resolving Charging Problems With Your Roomba i3
If your Roomba i3 isn’t charging, the problem could be with the charging station or the Roomba’s charging contacts.
Verifying the Charging Station
- Check the Power Outlet: Make sure the charging station is plugged into a working power outlet. Test the outlet with another device to confirm it’s providing power.
- Inspect the Charging Contacts: Clean the charging contacts on both the charging station and the Roomba with a dry cloth. Ensure there’s no debris or corrosion preventing a good connection. If you’ve verified the outlet and cleaned the contacts, but your Roomba still isn’t charging, the charging station itself might be faulty. You can find replacement Roomba Home Bases on Amazon.
Ensuring Proper Docking
- Positioning the Charging Station: Place the charging station on a hard, level surface against a wall. Make sure there are no obstructions around the charging station that could prevent the Roomba from docking properly.
- Manual Docking: Manually place the Roomba on the charging station to ensure it makes proper contact. The charging indicator light should illuminate to confirm that the Roomba is charging.
Addressing Navigation and Sensor Issues
Navigation problems can cause your Roomba i3 to get stuck, miss spots, or wander aimlessly. Cleaning the sensors can often resolve these issues.
Cleaning the Sensors
- Locate the Sensors: The Roomba i3 has several sensors, including cliff sensors (on the bottom), wall-following sensors (on the side), and an optical sensor (near the front).
- Wipe Down the Sensors: Use a soft, dry cloth to gently wipe down all the sensors. As you clean, carefully inspect the sensors. If you see any scratches, cracks, or other physical damage to the sensor lenses, cleaning alone may not solve the problem, and the sensor may need to be replaced. You can find replacement Roomba i3 sensors on Amazon
Resetting the Roomba’s Navigation
- Factory Reset: If cleaning the sensors doesn’t solve the navigation problems, you can try performing a factory reset. Consult your Roomba i3’s user manual for instructions on how to do this. Note that this will erase any custom settings.
Troubleshooting Software Glitches
Software glitches can sometimes cause your Roomba i3 to behave erratically. Here’s how to address these issues:
Checking for Software Updates
- iRobot App: Use the iRobot app to check for and install any available software updates. These updates often include bug fixes and performance improvements.
- Restart After Update: After installing an update, restart your Roomba to ensure the changes take effect.
Performing a Hard Reset
- Remove the Battery: Disconnecting the battery for a few minutes can sometimes resolve persistent software glitches.
- Reinstall the Battery: After a few minutes, reinstall the battery and restart the Roomba.
Pro Tips for Roomba i3 Maintenance
- Regular Cleaning: Clean the Roomba’s brushes, wheels, and sensors regularly to prevent buildup and ensure optimal performance.
- Scheduled Cleaning: Use the iRobot app to schedule regular cleaning sessions, even when you’re not home.
- Replace Parts: Replace worn-out brushes and filters as recommended by the manufacturer.
FAQ
Why is my Roomba i3 circling in one spot?
This usually indicates a problem with one of the wheels or sensors. Check for obstructions in the wheels and clean the sensors thoroughly.
How do I reset my Roomba i3?
Press and hold the “Clean” button for about 20 seconds until the light ring illuminates white. Then release the button.
Why is my Roomba i3 not connecting to Wi-Fi?
Ensure your Wi-Fi network is working properly and that you have the correct password. Restart your router and try connecting the Roomba again through the iRobot app.
What does the error light on my Roomba i3 mean?
The error light indicates a specific problem. Consult your Roomba i3’s user manual or the iRobot website to identify the error code and find a solution.
Warnings and Best Practices for Roomba i3 Usage
- Avoid Wet Surfaces: Do not use the Roomba on wet surfaces, as this can damage the motor and other components.
- Clear Obstacles: Before starting a cleaning session, clear the floor of any small objects, cords, or other obstacles that the Roomba might get stuck on.
- Supervise Pets: Supervise your pets during the first few cleaning sessions to ensure they don’t interfere with the Roomba.
Conclusion
Don’t let a malfunctioning Roomba i3 disrupt your cleaning routine. By following these troubleshooting steps, you can diagnose and fix many common issues, from battery problems to navigation errors. Regular maintenance, such as cleaning the sensors and brushes, can also help prevent problems and extend the life of your Roomba.
If you’ve tried these solutions and your iRobot Roomba i3 is still not working, it may be time to contact iRobot support for further assistance.