
The iRobot Roomba 550 has long been a trusted ally in maintaining a clean home, tirelessly navigating floors to pick up dirt, dust, and pet hair. However, even the most reliable robotic vacuum can encounter issues. One of the most common problems owners face is when the main brushes suddenly stop spinning. This can be frustrating, as the robot may continue to move around but leaves messes behind, rendering its primary function useless. Fortunately, this issue is often something you can diagnose and fix yourself with a bit of guidance.
This article provides a comprehensive guide to get your Roomba 550’s brushes working again. We will explore the common culprits behind this problem, from simple debris blockages to more complex mechanical faults. You will find a detailed, step-by-step troubleshooting process designed to walk you through inspection, cleaning, and potential part replacements. By following these instructions, you can effectively resolve the issue and learn essential maintenance practices to keep your Roomba operating at peak performance for years to come.
What Causes Roomba 550 Brushes to Stop?
When your Roomba’s main bristle and rubber brushes cease to rotate, the cause is typically mechanical rather than a major electronic failure. Before you can apply a solution, it’s helpful to know the potential sources of the problem. In most cases, the fault lies within the Cleaning Head Module (CHM), the assembly that houses the brushes, motor, and gearbox.
The single most frequent reason for stalled brushes is an excessive buildup of hair, string, and other fibers. This debris wraps tightly around the ends of the brushes and, more critically, works its way into the small plastic bearings that support them. When these bearings become clogged, the resulting friction is too great for the motor to overcome, causing the brushes to seize up. Similarly, a larger object like a small toy, bottle cap, or piece of fabric can become lodged in the brush cage, physically blocking rotation. In other instances, the problem is deeper inside the CHM’s gearbox, where plastic gears can become stripped or clogged with fine dust, preventing them from transferring power from the motor to the brushes.
Troubleshooting Your Roomba’s Brushes: A Detailed Guide
Follow these steps in order to diagnose and resolve the brush rotation problem. Most issues are solved in the first few steps, which involve thorough cleaning.
Step 1: The Initial Check and System Reset
Before disassembling anything, perform a quick inspection and a system reset. A simple software glitch can sometimes cause components to behave unexpectedly, and a reset can clear it.
- Flip Your Roomba Over: Place the Roomba upside down on a flat surface. Look for any large, obvious obstructions caught in the brushes or brush cage. Remove anything you find.
- Perform a System Reset: With the Roomba on its wheels, press and hold the large “CLEAN” button for approximately 10 seconds. You will hear a beep or a “rSt” message on the display. Release the button, and the Roomba will play a short tune to signal that the reset is complete.
After the reset, try running the Roomba again. If the brushes still aren’t turning, proceed to the next step.
Step 2: Performing a Thorough Brush Cleaning
This is the most crucial step and resolves the vast majority of brush-related issues. You will need the round cleaning tool that came with your Roomba or a pair of scissors.
- Access the Brushes: Turn the Roomba over again and remove the dustbin. Locate the two yellow tabs that hold the wire brush guard in place. Lift both tabs to release and remove the guard.
- Remove the Brushes: Lift out the main bristle brush (the one with bristles) and the flexible rubber brush.
- Clean the Brushes: Use your cleaning tool or scissors to carefully cut away and remove all hair, string, and debris wrapped around both brushes. Run your fingers along the full length of each brush to ensure nothing is left.
The Critical Bearing and Axle Cleaning
This sub-step is often missed but is essential for a complete fix. The small, colored bearings at the ends of the brushes are magnets for fine hair and dust.
- Remove the Bearings: The bristle brush has a yellow plastic bearing on one end. The flexible brush has a smaller, often green or yellow, cap on its end. Gently pull these bearings straight off the metal axles.
- Clean Bearings and Axles: You will likely find a dense wad of hair and dust compacted inside the bearings and wrapped around the metal axles. Use a small pick or tweezers to meticulously clean out the inside of the bearings and remove all debris from the axles. The bearings should be completely empty and the axles perfectly clean.
- Clean the Brush Housing: With the brushes removed, inspect the square and hexagonal receptacles in the red or green Cleaning Head Module where the brush ends sit. Use tweezers or compressed air to clean out any accumulated dust and grime from these sockets.
- Reassemble Correctly: Place the cleaned bearings back onto the brush axles. Re-insert the flexible rubber brush first, followed by the main bristle brush. Ensure both are seated correctly in their receptacles. Place the wire brush guard back over them and press down on both sides until the yellow tabs click securely into place.
Run your Roomba to see if this has solved the problem. If not, the issue may lie deeper within the CHM.
Step 3: Inspecting the Cleaning Head Module (CHM)
After a thorough cleaning, you can perform a simple manual test. With the brushes installed, try to spin them with your fingers. They should turn with some slight resistance from the motor’s gearbox. If they spin freely with no resistance, a gear may be broken. If they are completely stuck and impossible to move even after cleaning, the gearbox is likely seized. In either case, the problem is inside the CHM.
Step 4: Addressing a Faulty Cleaning Head Module
This step is for those comfortable with a bit of DIY repair. If the gearbox or motor has failed, the most effective solution is to replace the entire CHM.
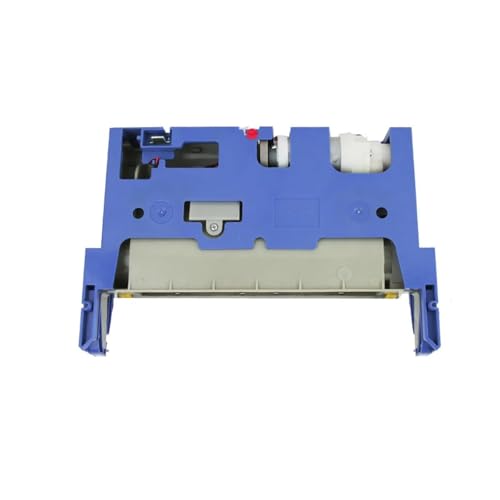
If your Roomba’s brushes are still not turning after thorough cleaning and inspection, the Cleaning Head Module (CHM) itself might be faulty. This module contains the motor and gearbox responsible for rotating the brushes. A replacement CHM can restore full functionality to your Roomba.

Genuine replacement for optimal performance

Affordable upgrade with improved cleaning

Cost-effective replacement with wide compatibility
Quieter and more efficient cleaning performance
For the technically inclined, the CHM can be removed by taking off the Roomba’s bottom plate and unscrewing the module. Once removed, the gearbox (a colored plastic box on the side of the CHM) can often be opened to inspect the internal gears. If you find stripped or broken plastic gears, replacing the entire module is the recommended and most reliable fix.
Proactive Care: Maintaining Your Roomba’s Brushes
Preventing problems is always better than fixing them. A consistent maintenance schedule is the key to keeping your Roomba’s brushes spinning freely.
- After Every 1-2 Cycles: Quickly pull out the brushes and remove any visible hair wrapped around them. This takes less than a minute and prevents major buildup.
- Once a Week: Perform a deep clean as outlined in Step 2. Remove the brushes and, most importantly, remove and clean the bearings and axles. This weekly habit is the single best thing you can do to prevent brush seizure.
- Every 6-12 Months: The brushes and bearings are consumable parts. Over time, bristles wear down and bearings lose their precise fit. Replace them with a new set to maintain optimal cleaning performance and reduce strain on the motor.
Regular replacement of your Roomba’s brushes and bearings is essential for maintaining optimal cleaning performance and preventing strain on the motor. Over time, brushes wear down and bearings can become loose or clogged, leading to decreased efficiency and potential issues with brush rotation.

Comprehensive replacement kit for 500 series with multiple brushes and filters.
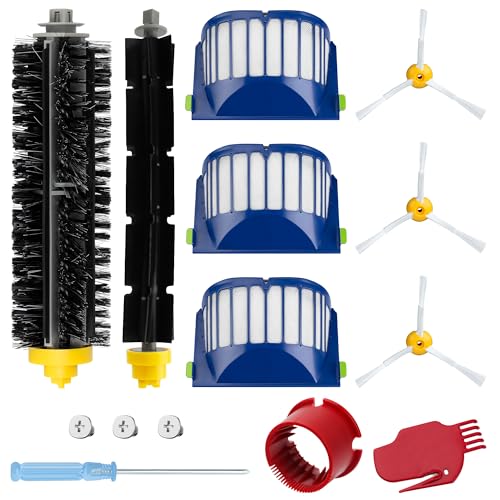
High-quality kit with essential replacement parts for 500 series.
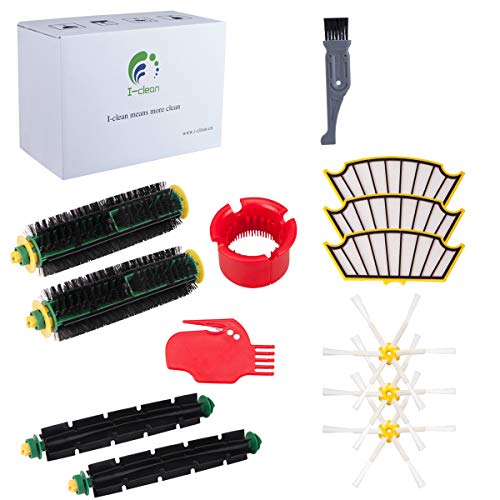
Includes cleaning tools and parts for enhanced 500 series performance.

Durable side brushes compatible with most 500 series models.
Frequently Asked Questions (FAQ)
What does the “Error 2” message mean on my Roomba?
The “Error 2, please clean Roomba’s brushes” message is specifically triggered when the robot’s main brushes are unable to turn. The most common reason for this error is that the brushes are clogged with hair and debris, especially around the bearings. Following the detailed cleaning guide in this article will typically resolve this error.
My side brush works, but the main brushes don’t. Why?
The side spinning brush and the main roller brushes are driven by two separate motors. If the side brush is working, it confirms that the robot’s main board is functional. The problem is therefore isolated to the main brushes, their bearings, the main brush motor, or the gearbox located within the Cleaning Head Module (CHM).
How often should I perform a deep clean on the brushes?
For optimal performance and to prevent future issues, a deep clean should be performed at least once a week, especially if you have pets or long-haired individuals in the household. A deep clean involves removing the brushes entirely and cleaning the bearings and axles, not just the brushes themselves.
Conclusion
A Roomba 550 with brushes that won’t turn is a common but highly solvable problem. More often than not, the solution does not require expensive repairs or professional service. The root cause is almost always a buildup of hair and debris in a critical but often overlooked spot: the brush bearings.
By adopting a regular and thorough cleaning routine, you can address the immediate issue and significantly reduce the likelihood of it happening again. Taking a few minutes each week to maintain the brushes, bearings, and axles will ensure your robotic vacuum continues to clean effectively, saving you time and keeping your floors spotless. With the knowledge from this guide, you are well-equipped to tackle this issue and keep your Roomba running like new.