
A Roomba i7 that fails to map the entire house can be frustrating. It undermines the robot’s ability to clean efficiently, schedule specific zones, and utilize its smart features effectively. This guide helps you identify why your Roomba i7 might be missing areas and provides step-by-step instructions to ensure comprehensive mapping and cleaning. We’ll cover everything from initial setup to advanced troubleshooting, ensuring your Roomba covers every nook and cranny of your home.
Ensure Proper Initial Setup
Proper setup is crucial for the Roomba i7 to map your home effectively.
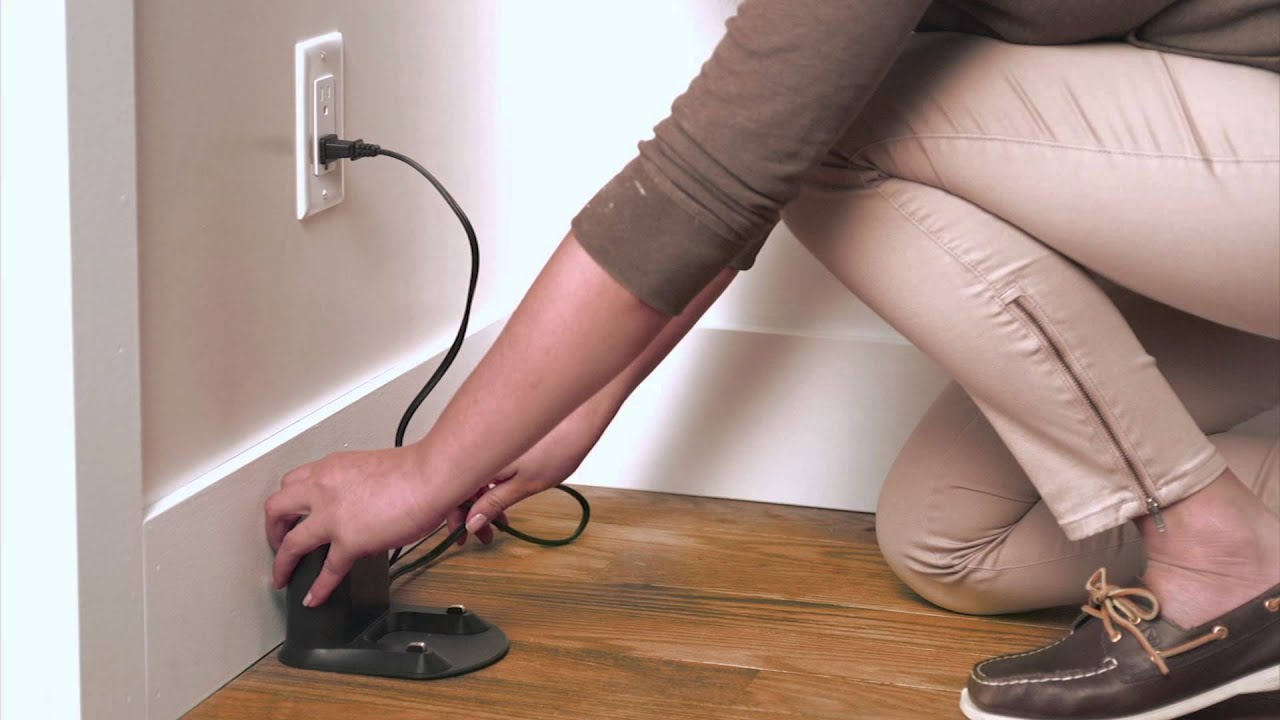
- Charging Station Placement: Place the Home Base in a central location with ample open space around it (at least 1 foot on each side) to facilitate easy navigation. Avoid placing it near obstacles or in cluttered areas[16].
- Initial Charge: Ensure your Roomba i7 is fully charged before its first mapping run. A full charge ensures it has enough power to cover your entire home.
- Wi-Fi Connection: Connect your Roomba i7 to your home Wi-Fi network via the iRobot Home App. Use a 2.4 GHz network, as the Roomba can have trouble connecting to 5 GHz networks[2].
- Software Update: Make sure your Roomba i7 has the latest firmware update installed. This ensures optimal performance and access to the newest features[2].
Preparing Your Home for Mapping
Preparing your home before a mapping run can significantly improve the Roomba’s performance.
- Clear Obstacles: Remove clothing, cords, toys, and other clutter from the floor. A clear environment allows the Roomba to move freely and map accurately[5].
- Open Doors: Ensure all doors to rooms you want mapped are open. The Roomba cannot map areas it cannot access.
- Adequate Lighting: Ensure there is adequate lighting throughout your home. The i7 uses its iAdapt localization camera to navigate, and dark rooms can impede its mapping capabilities[5]. Daylight or dim lighting is generally sufficient.
- Minimize Interference: Unplug devices that emit infrared (IR) signals, such as virtual reality headsets, as they can interfere with the Roomba’s sensors[5].
Creating a Smart Map
https://m.youtube.com/watch?v=5n97MaviH9o&pp=2AEAkAIB
The initial mapping run is critical for creating an accurate Smart Map.
- Mapping Run: Initiate a “Mapping Run” via the iRobot Home App. This mode allows the Roomba to focus solely on mapping without engaging the vacuum motor, saving battery life and time.
- Full Cleaning Cycle: Alternatively, you can run a full cleaning cycle. The Roomba will map your home while cleaning.
- Multiple Runs: iRobot recommends doing three full mapping or cleaning runs to ensure the map is as complete as possible[4]. Mapping runs are faster since the robot isn’t actively cleaning.
- Customize the Map: Once the mapping run is complete, the iRobot Home App will prompt you to review and customize the Smart Map. You can label rooms, divide spaces, and set cleaning zones[2].
Troubleshooting Mapping Issues

If your Roomba i7 is still not mapping the entire house, consider these troubleshooting steps:
- Sensor Cleaning: Clean the Roomba’s sensors, including the iAdapt Floor Tracking Sensor on the bottom and the cliff sensors. Use a dry microfiber cloth to remove any dust or debris[5].
- Restart the Roomba and App: Sometimes, a simple restart of both the Roomba and the iRobot Home App can resolve connectivity and mapping issues[2].
- Check for Physical Barriers: Inspect for any physical barriers or transitions that might prevent the Roomba from entering certain areas. Consider using Virtual Wall barriers to guide the Roomba.
- Revert to a Previous Map: If the map has become corrupted, revert to a previous version. In the iRobot Home App, go to History, select a Clean Map report you like from a previous cleaning job, and choose “Update Smart Map”[1].
- Mapping in Sections: If your home is large, try mapping it in sections. Use Virtual Wall barriers to confine the Roomba to a specific area, then move the barriers and map another section.
- Address Error Messages: Pay attention to any error messages the Roomba displays. Error messages can provide clues about specific issues, such as brush errors or sensor problems[3].
Advanced Tips for Accurate Mapping
https://m.youtube.com/watch?v=5n97MaviH9o&pp=2AEAkAIB
For persistent mapping problems, try these advanced techniques:
- Manual Updates: If the Roomba misses a spot, use your feet to gently guide it into the unmapped area during a cleaning run. Preventing it from leaving will encourage it to map the new space[4].
- Optimize Base Location: Ensure the base is in a central, uncluttered location to make it easier for the Roomba to navigate and update its map efficiently[16].
- Remove the Side Brush (for Mapping Runs): During mapping runs, remove the side brush to prevent it from spreading dirt or getting tangled in debris[4].
- Forcing New Area Discovery: Place the Roomba in the middle of the unmapped space and start a cleaning cycle. This encourages the Roomba to discover and map the new area[17].
- Contact iRobot Support: If all else fails, contact iRobot Customer Care for assistance. They can provide specific troubleshooting steps and may be able to push firmware updates or diagnose hardware issues[3].
FAQ
Why is my Roomba i7 cleaning in areas it’s not supposed to?
Your Roomba looks at the entire map to find the most efficient cleaning route, even if it means briefly entering areas not designated for cleaning[1]. This is normal behavior.
How do I handle rooms with different floor types?
The Roomba Combo j7 can detect and mop certain floor types. Set “No Mop Zones” in the iRobot Home App for chair mats, thin carpets, or special floor types where you don’t want mopping[1].
Can the Roomba i7 remember multiple floor plans?
Yes, the Roomba i7 can remember up to 10 unique floor plans, making it suitable for multi-story homes[15].
What if my Roomba’s map is distorted or shifted?
If the map has shifted over time, delete the existing map and perform a new mapping run after preparing your home to minimize obstacles [14].
What does the “Estimated Outer Wall” feature do?
As of July 2024, the map uses robot data to estimate the location of walls, providing a better view of your home’s floor plan in the app. This estimation does not affect cleaning performance [1].
How do I revert my smart map to a previous version?
In the iRobot Home App, go to History, select a Clean Map report you like from a previous cleaning job, and choose “Update Smart Map”[1].
Tips, Warnings, and Best Practices
- Safety First: Always disconnect the Roomba from the charging station before cleaning or maintaining it[3].
- Avoid Water Damage: Do not spray cleaning solution or water directly onto the sensors or sensor openings[3].
- Regular Maintenance: Clean the Roomba regularly, including emptying the bin, cleaning the filter, and cleaning the brushes, to maintain peak performance[3].
- Monitor Cleaning Performance: If you notice the Roomba is picking up less debris, it’s time to empty the bin and clean the filter and brushes[3].
- Proper Storage: Store the Roomba in a dry place and avoid exposing it to extreme temperatures or humidity.
Conclusion
By following these troubleshooting steps and best practices, you can ensure your i7 Roomba accurately maps your entire house and cleans it efficiently. Proper setup, regular maintenance, and addressing common issues will help you maximize the benefits of your robotic vacuum. Take the time to implement these solutions, and you’ll enjoy a cleaner, smarter home. If mapping is still not working, contact iRobot Support.