
Disabling your Roomba’s schedule can be necessary for various reasons, such as going on vacation, changing cleaning routines, or troubleshooting issues. Many users find the scheduling feature convenient, but there are times when you need to take control and stop the automated cleaning. This guide provides simple, clear instructions on how to disable your Roomba’s schedule, ensuring you can manage your cleaning robot according to your specific needs.
Whether you’re using the iRobot app or the physical buttons on your Roomba, turning off the schedule is a straightforward process. This article will walk you through each method, providing pro tips and troubleshooting advice to ensure a smooth experience. By the end, you’ll be able to confidently manage your Roomba’s schedule, adapting it to your lifestyle and preferences.
Disabling Roomba Schedule via the iRobot App
The iRobot app provides the most convenient way to manage your Roomba’s schedule. Here’s how to disable the schedule using the app:
- Open the iRobot App: Locate the iRobot app on your smartphone or tablet and tap to open it. Ensure your Roomba is connected to your Wi-Fi network and that you are logged into your account.
- Navigate to Schedule Settings: Once the app is open, look for the “Schedule” icon or a similar option in the main menu. Tap on it to access the scheduling settings for your Roomba.
- Disable the Schedule: In the schedule settings, you should see a list of your currently scheduled cleaning times. To disable the entire schedule, look for a toggle switch or a button labeled “Enable/Disable Schedule.” Switch the toggle to the “Off” position.
- Confirm the Change: The app may ask you to confirm your decision to disable the schedule. If prompted, confirm to save the changes. Your Roomba will no longer start cleaning automatically at the previously scheduled times.
Pro Tip: Temporarily Pausing a Schedule
If you don’t want to completely disable the schedule but need to skip a few cleaning sessions, many apps allow you to temporarily pause the schedule. Look for a “Pause” or “Snooze” option within the scheduling settings.
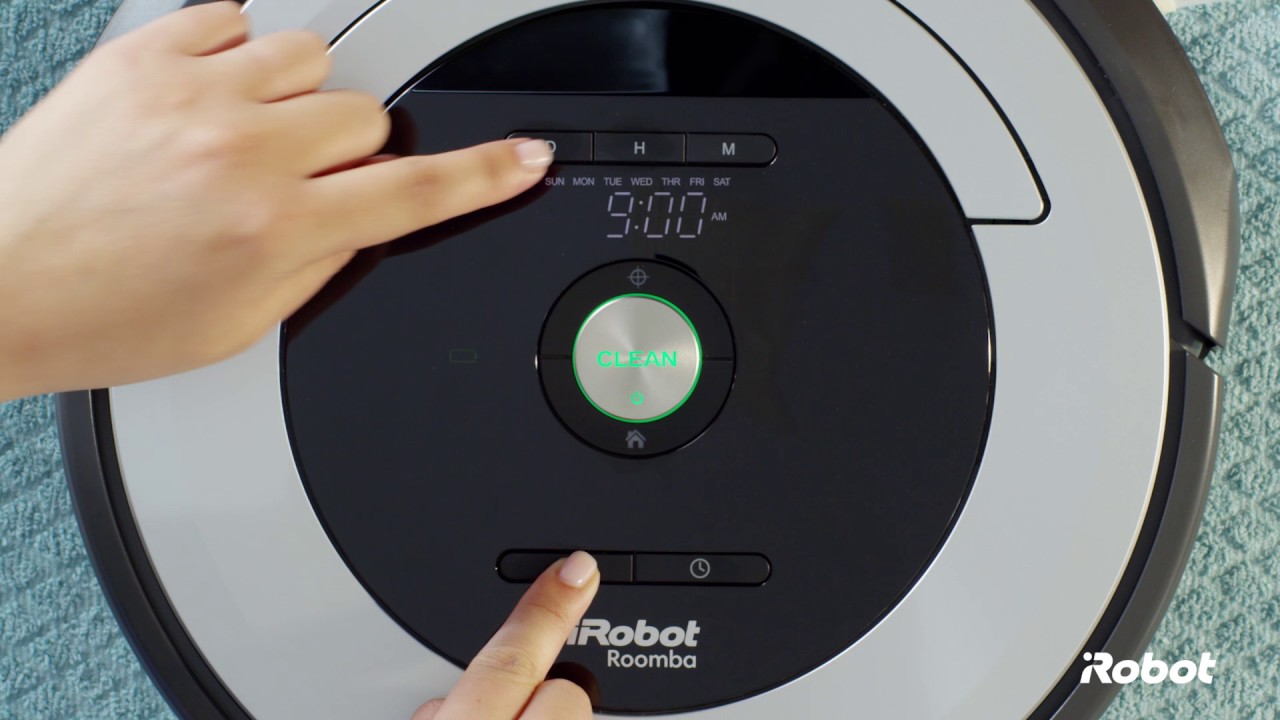
Disabling Roomba Schedule on the Robot Itself
![]()
If you prefer not to use the app, or if you are having trouble connecting to the app, you can disable the schedule directly on the Roomba itself. Note that this method may vary slightly depending on your Roomba model.
- Locate the Buttons: Identify the buttons on your Roomba. Common buttons include “Clean,” “Home,” and “Spot Clean.” Some models may have additional buttons for scheduling or settings.
- Press and Hold the “Clean” Button: Press and hold the “Clean” button on your Roomba for about three to five seconds.
- Check for an Indicator Light: Look for an indicator light that signals the schedule has been disabled. Some models may beep or display a message.
- Test the Change: To ensure the schedule is disabled, wait for the next scheduled cleaning time to pass. If your Roomba does not start cleaning, the schedule has been successfully disabled.
Note: Model-Specific Instructions
Some Roomba models may have unique button combinations or procedures for disabling the schedule. Consult your Roomba’s user manual for specific instructions tailored to your model.
Managing Multiple Roomba Schedules
For households with multiple Roombas, managing schedules can become a bit more complex. Here’s how to handle scheduling for multiple devices:
- Identify Each Roomba: Ensure each Roomba is clearly identified in the iRobot app. You can rename each Roomba to easily distinguish between them (e.g., “Upstairs Roomba,” “Downstairs Roomba”).
- Set Individual Schedules: Access the schedule settings for each Roomba separately. Set different cleaning times for each device based on the specific needs of each area in your home.
- Disable Schedules Individually: If you need to disable the schedule for one Roomba but not others, make sure to access the correct device in the app and disable its schedule independently.
Practical Example: Setting Different Schedules
For instance, you might schedule your downstairs Roomba to clean every morning and your upstairs Roomba to clean every afternoon. This ensures each area receives the attention it needs without over-cleaning.
Troubleshooting Common Scheduling Issues
Even with clear instructions, you might encounter issues while disabling your Roomba’s schedule. Here are some common problems and their solutions:
- Roomba Still Cleans at Scheduled Times:
- Solution: Double-check that the schedule is completely disabled in the app. Ensure no individual cleaning times are still active. Restart the Roomba by turning it off and on again.
- Unable to Connect to the iRobot App:
- Solution: Verify that your Roomba is connected to your Wi-Fi network. Restart your router and try connecting again. Update the iRobot app to the latest version.
- Forgot Roomba Model-Specific Instructions:
- Solution: Refer to the user manual for your specific Roomba model. You can usually find a digital copy of the manual on the iRobot website.
- Schedule Re-Enables Automatically:
- Solution: This can happen due to software glitches. Try resetting your Roomba to factory settings and then reconfiguring it.
Warning: Resetting Roomba to Factory Settings
Be cautious when resetting your Roomba to factory settings, as this will erase all saved preferences and settings. Only do this if other troubleshooting steps have failed.
Best Practices for Roomba Scheduling
To make the most of your Roomba’s scheduling feature, consider these best practices:
- Regularly Update the App: Keep the iRobot app updated to benefit from the latest features and bug fixes.
- Monitor Cleaning Performance: Periodically check the cleaning performance of your Roomba to ensure it’s effectively cleaning your floors.
- Adjust Schedules Seasonally: Adjust your cleaning schedules based on seasonal changes. For example, increase cleaning frequency during shedding season for pets.
- Clean Roomba Regularly: Maintain your Roomba by cleaning its brushes, filters, and sensors regularly to ensure optimal performance.
FAQ
How do I completely turn off the Roomba if I’m going on vacation?
To completely turn off your Roomba, first disable the cleaning schedule via the iRobot app or the robot itself. Then, power down the Roomba by holding the power button until all lights turn off. Store it in a cool, dry place, and consider removing the battery for extended storage.
Can I disable the schedule for only one day?
Yes, most versions of the iRobot app allow you to edit the schedule and remove a specific day’s cleaning. Access the schedule settings, find the day you want to skip, and either delete that entry or uncheck the box next to it.
What happens if I disable the schedule and then forget to manually start the Roomba?
If you disable the schedule and forget to manually start the Roomba, your floors will not be cleaned until you manually initiate a cleaning session. To avoid this, set a reminder on your phone or consider re-enabling the schedule.
How do I know if my Roomba schedule is actually disabled?
After disabling the schedule, observe your Roomba during the time it was previously scheduled to clean. If it remains idle, the schedule is successfully disabled. You can also check the iRobot app to confirm that the schedule toggle is in the “Off” position.
Is it better to disable the schedule or just let the Roomba run its course?
The best option depends on your needs. Disabling the schedule gives you more control over when and how often your Roomba cleans. If you have unpredictable schedules or want to conserve battery, disabling the schedule is preferable. If you prefer consistent, hands-off cleaning, maintaining the schedule is the better choice.
Conclusion
Disabling your Roomba’s schedule is a simple yet essential task for managing your cleaning robot effectively. Whether you use the iRobot app or the physical buttons on the device, understanding how to disable the schedule allows you to adapt your Roomba to your lifestyle and cleaning needs. By following the steps outlined in this guide, you can confidently control when and how your Roomba cleans, ensuring your home remains tidy and well-maintained.
Take the next step and customize your Roomba’s settings to perfectly match your cleaning preferences. Experiment with different schedules and cleaning modes to discover the optimal configuration for your home.