
Is your Roomba not cleaning as effectively as it used to? One often-overlooked area that can significantly impact its performance is the side wheels. These wheels are crucial for navigating your home and ensuring a thorough clean, but they can easily get clogged with hair, dust, and debris. This guide will walk you through the simple steps to clean your Roomba’s side wheels, keeping your robot vacuum running smoothly and efficiently. Maintaining your Roomba, including its side wheels, is essential for prolonging its lifespan and ensuring it continues to provide optimal cleaning.
Why Clean Your Roomba’s Side Wheels?

Regular cleaning of your Roomba’s side wheels is vital for several reasons:
- Prevents Wear and Tear: Accumulation of dirt and hair can cause unnecessary friction and wear on the wheel motor, potentially leading to premature burnout.
- Maintains Optimal Performance: Clean wheels ensure smooth movement and proper navigation, allowing your Roomba to cover your floors effectively.
- Extends Roomba’s Lifespan: Regular maintenance, including wheel cleaning, helps prolong the overall lifespan of your Roomba, saving you money in the long run.
- Avoids Damage: Debris buildup can cause the wheels to jam or get stuck, potentially damaging the Roomba’s internal mechanisms.
Tools You’ll Need
Before you begin, gather these essential tools:
- Philips Screwdriver: A standard size for removing the base plate and a smaller one for the wheel assembly.
- Microfiber Towels: Soft, lint-free towels for wiping away dust and grime.
- Small Brush or Handheld Vacuum: To remove loose debris.
- Optional:
- Rubber gloves to keep your hands clean.
- Ziplock bags for storing screws.
- Compressed air for blowing out stubborn debris.
- Isopropyl alcohol for cleaning sensors.
Preparation Steps
- Power Off: Ensure your Roomba is completely switched off before starting any maintenance.
- Clear the Area: Work on a clean, well-lit surface to avoid losing any small parts. A white towel can prevent scratches on the Roomba’s exterior.
- Gather Your Tools: Keep all your tools within easy reach.
Step-by-Step Guide to Cleaning Roomba Side Wheels
Here’s how to clean your Roomba’s side wheels for optimal performance:
- Flip the Roomba: Turn the Roomba upside down, placing it on a soft towel to protect its surface.
- Remove the Side Brush (if applicable): Some Roomba models have a side brush that needs to be removed first. Use a screwdriver or coin to loosen the screw holding the side brush in place. Store the screw in a safe place to avoid losing it.
- Remove the Base Plate: Use a Philips screwdriver to loosen the four bolts holding the base plate. With the side brush out of the way, you can remove the base plate.
- Remove the Wheel Assembly: Each side wheel is typically held in place by three bolts. Use a smaller Philips screwdriver to carefully loosen these bolts. Don’t remove the bolts entirely; loosen them enough to extract the wheel assembly. Gently pull the wheel assembly out.
- Clean the Wheel Assembly:
- Wipe with a Microfiber Towel: Rub the wheels gently with a clean, dry microfiber towel to remove any visible dust and debris. Rotate the wheels to clean all surfaces.
- Remove Stubborn Debris: If there’s grime or sticky residue, dampen the microfiber towel slightly to wipe the wheels clean. For hard-to-reach areas, use a small brush or a handheld vacuum with a brush attachment.
- Check for Hair and Debris Underneath: Push each wheel gently to check for any hidden accumulation of debris.
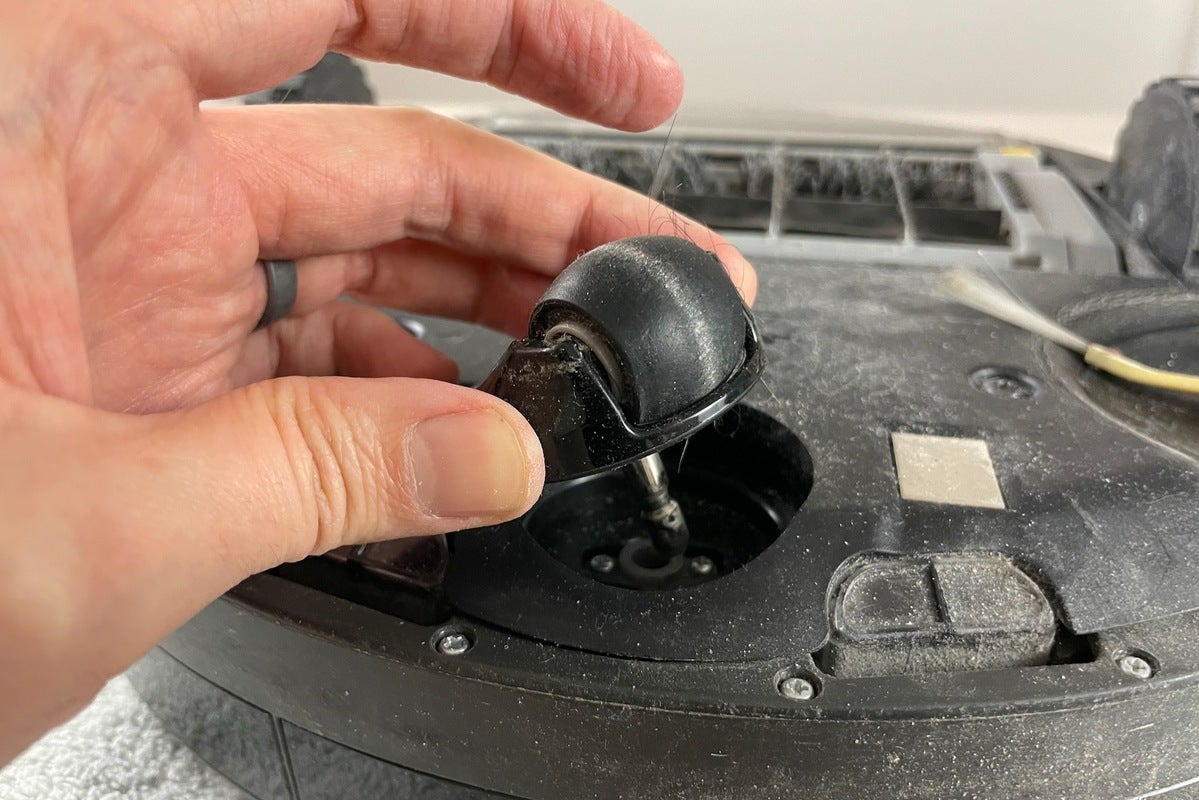
- Remove the Wheel (Optional): For a deeper clean, you can remove the wheel from the caster assembly. Grab the wheel at the edges and tug. Once removed, wipe the wheel and the caster assembly with a clean microfiber towel. You can also slide the metal pin out to remove any hair or debris on it. Don’t forget to wipe the base where the wheel is attached.
- Inspect and Clean All Parts: Examine each part of the wheel assembly, including the wheel well and the surrounding area. Use a dry towel to clean these components, as moisture can damage electrical and metal parts.
- Reassemble the Wheel Assembly: Once everything is clean and dry, reassemble the wheel assembly. Ensure all parts are properly aligned before tightening the bolts.
- Reattach the Base Plate: Place the base plate back onto the Roomba and secure it with the four bolts you removed earlier.
- Reattach the Side Brush (if applicable): If your Roomba has a side brush, reattach it and tighten the screw.
- Test the Wheels: Push the wheels up and down several times to dislodge any remaining debris. Manually turn both wheels to ensure they move freely with the same amount of resistance. If a wheel is difficult to turn, manually push Roomba backward and forward on the floor.
If you notice any damage or wear, see replacement wheels on Amazon.
Troubleshooting Guide

Here are some common problems you might encounter and how to solve them:
- Roomba Wheel Not Spinning:
- Problem: Wheel is clogged with hair and debris.
- Solution: Disassemble the wheel assembly and thoroughly clean all parts.
- Roomba Moving Slowly or in Circles:
- Problem: One or both wheels are not moving freely.
- Solution: Check for obstructions and clean the wheels. Ensure the wheel assembly is properly reassembled.
- Side Brush Not Spinning (if applicable):
- Problem: Side brush motor is faulty or brush is damaged.
- Solution: Clean the brush and the area around it. If the brush still doesn’t spin, consider replacing the side brush module.
- Roomba Not Charging:
- Problem: Dirty charging contacts.
- Solution: Clean the charging contacts on both the Roomba and the Home Base with a melamine foam.
Pro Tips for Roomba Wheel Maintenance
- Regular Cleaning: Clean the Roomba’s wheels at least once a month, or more frequently if you have pets or notice a decline in performance.
- Use Compressed Air: Use compressed air to blow out any stubborn debris from the wheel wells and other hard-to-reach areas.
- Lubricate the Side Brush Module: While cleaning, lubricate the side brush module with oil to prevent sticking and rusting.
- Replace Worn Parts: Replace the side brushes every 6-12 months to ensure optimal cleaning efficiency.
Alternatives/Variations

- Basic Cleaning: For a quick clean, you can simply wipe the wheels with a damp cloth without disassembling the wheel assembly.
- Deep Cleaning: For a more thorough clean, you can remove the wheels from the caster assembly and soak them in warm, soapy water before scrubbing them with a brush.
FAQ
How often should I clean my Roomba’s side wheels?
It’s generally recommended to clean your Roomba’s side wheels every month, but if you have pets or notice a significant amount of hair and debris, you may need to clean them more frequently, possibly every two weeks. Regular maintenance ensures optimal performance.
What happens if I don’t clean the Roomba wheels?
If you neglect cleaning the Roomba wheels, dirt, hair, and debris will accumulate, causing the wheels to lose traction and affecting the Roomba’s ability to navigate and clean effectively. This can also strain the wheel motor, leading to premature failure and reducing the lifespan of your Roomba.
How do I know if my Roomba side brush needs replacing?
You should replace your Roomba side brush if you notice that it’s frayed, damaged, or no longer spinning properly. Replacing the side brush every 6-12 months ensures your Roomba maintains its cleaning efficiency.
Can I use water to clean the Roomba’s side wheels?
Yes, you can use a damp cloth to clean the Roomba’s side wheels. However, avoid using excessive water, as it can damage the internal components. Ensure the wheels are completely dry before reassembling them.
What type of screwdriver should I use to clean the Roomba side wheels?
You’ll need a Philips screwdriver to remove the base plate and wheel assembly. It’s best to have a standard-sized screwdriver for the base plate and a smaller one for the wheel assembly, ensuring a snug fit to avoid stripping the screw heads.
What do I do if the side brush stops spinning after cleaning?
If the side brush stops spinning after cleaning, first ensure that the brush is properly reattached and the screw is tightened. If the issue persists, the side brush motor may be faulty, and you may need to replace the side brush module.
Tips, Warnings, and Best Practices
- Safety First: Always power off and unplug your Roomba before performing any maintenance.
- Avoid Over-Tightening: Be careful not to over-tighten the screws when reassembling the wheel assembly or side brush, as this can damage the plastic components.
- Use Gentle Cleaning Products: Avoid using harsh chemicals or abrasive cleaners, as they can damage the Roomba’s wheels and other parts.
- Regular Inspections: Regularly inspect the Roomba’s wheels and brushes for signs of wear and tear, and replace them as needed.
Conclusion
Cleaning your Roomba’s side wheels is a simple yet crucial part of maintaining its performance and extending its lifespan. By following this step-by-step guide, you can ensure that your Roomba continues to navigate your home efficiently and deliver a thorough clean every time. So, take a few minutes each month to clean those wheels and enjoy a cleaner home with a Roomba that runs like new!
If your Roomba side brush is still not spinning after cleaning the wheels and following the above steps, consider purchasing a replacement side brush module from the iRobot store.