
Is your trusty Roomba 500 series robot suddenly refusing to charge? This common and frustrating issue can bring your automated cleaning routine to a screeching halt. When the familiar charging light fails to appear, it’s easy to assume the worst. However, the problem often stems from simple, correctable issues like dirty charging contacts, a misaligned base connection, or a battery that simply needs a system reset to restore its functionality.
This comprehensive guide will walk you through the essential steps to diagnose and resolve charging problems with your Roomba 500 series. We will cover everything from basic preliminary checks to two distinct battery reset procedures designed to revive your robot’s power source. You’ll learn how to effectively clean charging contacts and what to do when a full battery replacement is the only option left. By following these instructions, you can get your cleaning companion back on its dock and back to work.
Initial Checks for Charging Problems

Before diving into more complex solutions, it’s crucial to perform a few basic checks. These simple steps can often identify and fix the charging issue without any need for advanced troubleshooting. Start by examining the physical setup of your Roomba and its charging station.
First, ensure the battery is correctly installed inside the robot. Turn your Roomba upside down and verify that the battery pack is firmly seated in its compartment, with the release latch securely locked. A loose battery cannot make the proper internal connection required to receive a charge. Next, carefully inspect the charging base and its power cord for any visible signs of damage, such as frayed wires or bent prongs. A compromised power supply will prevent electricity from reaching the base. Finally, take a soft, dry cloth and gently wipe the metal charging contacts on both the underside of the Roomba and the top of the charging base. Dust and debris can accumulate over time, creating a barrier that obstructs the flow of power.
If your charging base or its power cord appears damaged, replacing it can often resolve charging issues by ensuring a stable power supply to your Roomba.

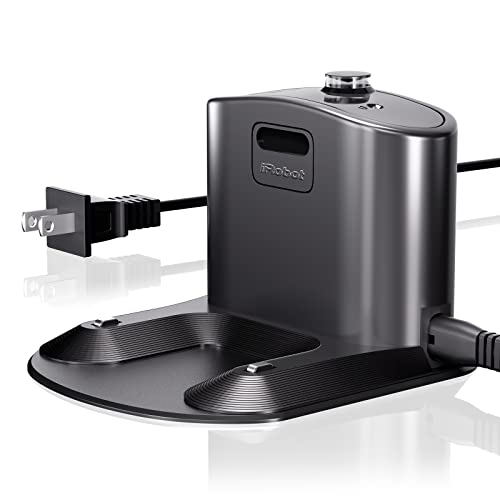
Official replacement charging base for Roomba 500 series with wide voltage support and included accessories.

High-quality replacement dock with universal voltage and compatibility across multiple Roomba models.
Affordable replacement with 110-220V support and extensive model compatibility.

Cost-effective option with updated contacts and wide voltage compatibility.
A Guide to Roomba Battery Resets
If the initial checks don’t solve the problem, the next step is to perform a battery reset. This process can resolve software glitches or memory errors within the robot that prevent it from charging correctly. There are two primary reset procedures for the Roomba 500 series, each suited for different situations.
Standard Battery Reset Procedure
This general reset is the first one you should try. It effectively power-cycles the robot and its battery, clearing any temporary faults.
- Power Down the Robot: Press and hold the “Clean” button on your Roomba. Wait until all the lights turn off and the robot powers down completely.
- Remove the Battery: Flip the Roomba over to access its underside. Find the battery release latch and slide it to unlock the battery compartment. Gently pull the battery pack straight out of the robot.
- Disconnect the Base: Unplug the charging base from the wall outlet. This ensures the entire charging system is powered down.
- Discharge Residual Power: With the battery still removed, press and hold the “Power” or “Clean” button on the Roomba for about 30 seconds. This step drains any leftover electrical charge from the robot’s internal components.
- Reinstall the Battery: Align the battery pack with the slot in the Roomba and gently push it back in until you hear a click, confirming it is securely locked in place.
- Reconnect and Charge: Plug the charging base back into the wall outlet. Carefully place the Roomba onto the base to begin the charging process. For best results, allow the robot to charge uninterrupted overnight. This extended charging session helps the battery recalibrate properly.
- Test the Results: After the overnight charge, take the Roomba off its base, press the “Clean” button to turn it on, and let it run a full cleaning cycle to confirm the issue is resolved.
Advanced Reset for Specific Models
If your Roomba 530, 550, or 560 model exhibits symptoms like a very short runtime (less than 20 minutes) or an unusually fast charging time (under 2.5 hours), this advanced reset can help restore the battery’s capacity. This process is more intensive and requires a 72-hour deep charge.
- Activate Reset Mode: Turn the robot on by pressing the “Clean” button. Then, simultaneously press and hold the “Spot” and “Dock” buttons until the “Clean” button’s light dims.
- Initiate Direct Charging: Plug the Roomba’s original charger directly into the charging port on the side of the robot itself. Do not use the charging station for this step.
- Perform the Deep Charge: Allow the robot to charge until the “Clean” button turns solid green. Once it turns green, leave it connected to the charger for an additional 72 hours without any interruption. This extended period is critical for fully conditioning and restoring the battery.
- Discharge the Battery Fully: After the 72-hour charge, disconnect the charger. To completely drain the battery, initiate a cleaning cycle.
- For models with a “Dock” button: Press the “Dock” button (do not use the home base). The Roomba will run until its battery is completely depleted, which is signaled by a “dead battery” sound and a flashing red “Clean” button.
- For models without a “Dock” button: Manually start multiple cleaning cycles until the battery is fully drained and you hear the “dead battery” sound.
- Evaluate Performance: After the full discharge, place the Roomba back on its charging base to recharge normally. If the runtime has not improved, you may need to repeat the process or consider that the battery has reached the end of its life.
Solving Common Charging Contact Issues
The physical connection between your Roomba and its charging base is essential for successful charging. Over time, these connection points can become dirty or misaligned, interrupting the flow of electricity.
Cleaning Corroded Charging Contacts
The small metal plates on the Roomba and the charging base are susceptible to oxidation and debris buildup, which creates resistance and prevents a solid electrical connection. For persistent issues, a simple wipe-down may not be enough.
To ensure optimal conductivity, it’s recommended to clean these contacts with fine-grit sandpaper approximately every two weeks. Lightly sand each contact point—both on the robot and the base—about 10 to 15 times. This gentle abrasion will remove any stubborn corrosion or grime. After sanding, use your finger or a soft cloth to wipe away any residual dust.
Correcting Misaligned Charging Contacts
Sometimes, the Roomba may not sit perfectly on the charging base, leading to poor contact alignment. If you notice the charging light flickering or failing to activate consistently, a slight adjustment may be all that’s needed.
When you place your Roomba on its charging station, use a pencil or a similar object to gently lift the front base of the robot by a tiny amount. This subtle change in angle can help the vacuum’s contacts press more firmly against the contacts on the base, establishing a secure and reliable connection for charging.
When to Consider a Battery Replacement
If you have performed all the troubleshooting steps—including the intensive 72-hour reset—and your Roomba 500 series still fails to charge or hold a charge, the battery itself has likely reached the end of its operational life. Rechargeable batteries have a finite number of charge cycles, and after years of use, they will inevitably degrade.
When this happens, the most effective solution is to purchase a new battery.

High-capacity battery with extended runtime and safety certifications

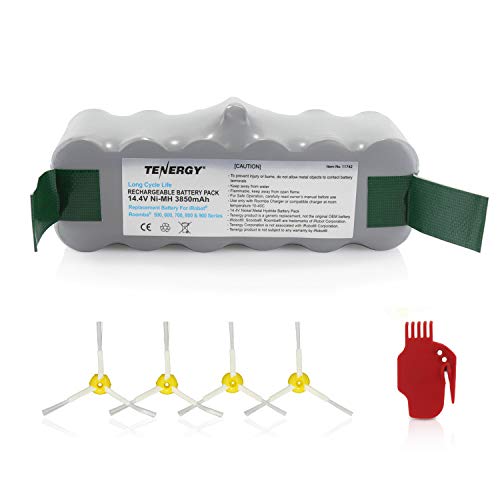
Durable battery with 12-month warranty and quick customer support
Upgraded battery with wide compatibility and safety protection
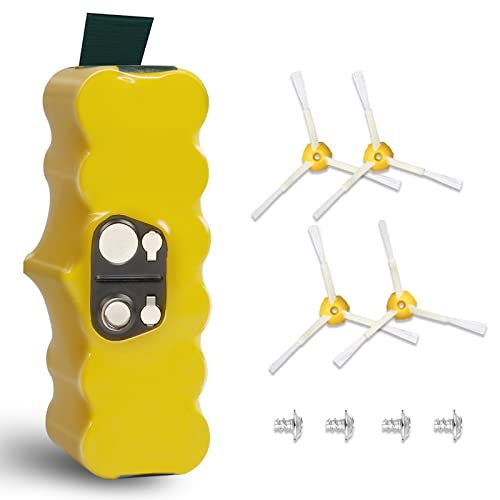
Long-lasting battery with 1000 cycles and bonus brushes
Replacing the battery is a straightforward process and is the final step to restoring your robot to its full cleaning potential.
Frequently Asked Questions (FAQ)
How do I perform a basic reset on my Roomba 500?
To perform a basic reset, power off the Roomba, remove the battery, and unplug the charging base. Press and hold the “Clean” button for 30 seconds to discharge any remaining power. Then, reinstall the battery, plug the base back in, and place the Roomba on the charger to charge overnight.
Why is my Roomba’s runtime so short?
A short runtime can be caused by a battery that needs conditioning. You can address this by performing the advanced 72-hour reset, which involves charging the robot directly for three days. If this deep-charge cycle does not improve performance, it typically indicates that the battery is old and needs to be replaced.
How often should I clean the charging contacts?
For best performance, you should clean the metal charging contacts on both the Roomba and its base every two weeks. Use fine-grit sandpaper to lightly sand the contacts 10-15 times, followed by wiping them with a soft cloth to remove any debris or oxidation.
What should I do if my Roomba won’t charge after trying everything?
If you have cleaned the contacts, performed both the standard and advanced resets, and confirmed the power supply is working, the problem is almost certainly the battery. At this point, the battery has likely reached the end of its lifespan, and purchasing a replacement is the necessary next step.
Conclusion
A Roomba 500 series that won’t charge is a solvable problem. By systematically working through the solutions presented in this guide, you can effectively diagnose and fix the issue. Start with simple checks like ensuring the battery is properly seated and the contacts are clean. If the problem persists, move on to the standard battery reset to clear any system errors. For more stubborn issues related to battery capacity, the 72-hour deep-charge cycle offers a powerful way to restore performance.
These steps empower you to handle one of the most common Roomba maintenance tasks yourself, often saving you time and money. However, if all else fails, remember that batteries are consumable parts. A straightforward battery replacement is the definitive solution to get your reliable cleaning assistant back up and running for years to come.