
A Roomba 360 is a fantastic tool for keeping your floors clean with minimal effort, but its autonomy relies entirely on its ability to charge. When your robotic vacuum suddenly refuses to power up, it can disrupt your entire cleaning schedule and cause significant frustration. A non-charging Roomba can feel like a complex technical failure, but often, the root cause is something you can easily diagnose and fix yourself with a bit of guidance.
This comprehensive guide will walk you through the entire process of getting your Roomba 360 back in working order. We will explore the common culprits behind charging failures, from dirty contacts and power supply issues to software glitches and battery problems. You will learn a step-by-step diagnostic process to pinpoint the exact issue and find the most effective solution, empowering you to solve the problem and get your automated cleaning partner back on the job.
Common Reasons Your Roomba 360 Isn’t Charging

When your Roomba 360 fails to charge, the problem usually falls into one of a few key categories. By methodically checking each potential cause, you can narrow down the issue without resorting to guesswork.
Issues with the Charging Dock and Power Supply
The first place to investigate is the external power hardware. A faulty charging dock or an unreliable power source is a frequent cause of charging problems. The dock itself can suffer from wear and tear or internal electrical failures. Similarly, the wall socket it’s plugged into could be the issue, or an extension cord might be malfunctioning. Always ensure the power cord is securely plugged into both the dock and a working wall outlet.
Dirty or Obstructed Charging Contacts
For your Roomba to charge, a solid physical connection must be established between the metal charging contacts on the underside of the robot and the corresponding contacts on the Home Base. Over time, these small metal plates can accumulate dust, hair, and other debris. This buildup creates a barrier that prevents electricity from flowing correctly, even if the Roomba appears to be docked properly.
Battery Health and Lifespan
The rechargeable battery inside your Roomba 360 is a consumable component with a finite lifespan. After several years of regular use, its ability to hold a charge will naturally diminish until it can no longer power the device. If your Roomba is older and this problem has developed gradually, a depleted battery is a very likely suspect.
Software Glitches and Firmware
Modern robotic vacuums rely on sophisticated software to manage their operations, including the charging cycle. Occasionally, a software glitch can interfere with this process, causing the Roomba to fail to recognize the charging dock or initiate charging. In other cases, the device’s firmware might be outdated, leading to compatibility issues or known bugs that have been fixed in a newer version.
A Step-by-Step Troubleshooting Guide
Follow these structured steps to systematically diagnose and resolve the charging issue with your Roomba 360. Start with the simplest solutions and progress to more involved steps if the problem persists.
Step 1: Check the Basics First
Before disassembling anything, perform a quick visual inspection of the setup. These simple checks resolve a surprising number of charging problems.
Inspect the Power Indicator Lights
Your Roomba communicates its status through its indicator lights. When placed on the dock, observe the light’s behavior. A steady green light typically indicates that the battery is fully charged, while a pulsing or steady light of another color (often amber or white, depending on the model) signifies it is actively charging. A blinking red light is a clear signal that there is a charging error that needs your attention.
Verify the Dock Connection
Ensure your Roomba 360 is seated correctly on the charging dock. Lift the robot and place it back down, making sure you feel it settle into place. There should be no wobble or gap between the robot and the base. Remove any potential obstructions, such as stray toys, rug corners, or debris, that might be preventing the Roomba from docking fully.
Test Different Power Sources
To rule out a problem with your home’s electricity, unplug the charging dock and plug it into a different wall outlet that you know is working. If you are using an extension cord or a surge protector, try plugging the dock directly into the wall. This will help determine if the issue lies with the power accessory rather than the Roomba or its dock. Also, inspect the Roomba’s power cord for any visible signs of damage, such as fraying or cuts. If you see any damage, the cord needs to be replaced.
If your Roomba’s power cord is visibly damaged, frayed, or cut, it needs to be replaced to ensure safe and proper charging.

Official compatible power cord for Roomba i1+/i3+ and more with automatic dirt disposal.

Affordable 2-prong power cord for Roomba 600/700/800/900 series and i-series.

Durable 6-foot extension for iRobot home base charging docks.

High-quality replacement cord for 600/800/900 series and i-series.
Step 2: Perform Essential Cleaning
A clean Roomba is a happy Roomba. Dirt and debris are the most common culprits behind poor charging connections.
How to Clean the Charging Contacts
The metal contacts on both the Roomba and the dock must be clean and bright. To clean them: 1. Unplug the charging dock from the wall. 2. Turn your Roomba over to access the contacts on its underside. 3. Use a clean, dry, lint-free cloth or a soft-bristled brush to gently wipe the metal charging contacts on both the robot and the dock. For stubborn grime, you can slightly dampen a melamine foam sponge (like a Magic Eraser) to scrub the contacts. 4. Ensure the contacts are completely dry before plugging the dock back in and attempting to charge again.
Clean the Underside of the Roomba
While you have the robot turned over, take the opportunity to wipe down its bottom surface. Removing caked-on dust and tangled hair can help ensure the device sits flush on the dock, promoting a better connection.
Step 3: Address Software and Firmware
If the hardware and connections seem fine, the issue may be digital. Software resets and updates can clear internal errors that block the charging process.
Update the Firmware
An outdated firmware can cause a variety of performance issues, including charging failures. To check for updates: 1. Ensure your Roomba 360 is connected to your home’s Wi-Fi network. 2. Open the iRobot Home app on your smartphone. 3. Navigate to your device settings. The app will notify you if a firmware update is available. 4. Follow the in-app prompts to download and install any updates.
Perform a Factory Reset
A factory reset will revert the Roomba’s software to its original state, clearing out any persistent glitches. This will erase custom settings and schedules, so use it as a later step in troubleshooting. To perform the reset, press and hold the “Clean” and “Spot” buttons simultaneously for about 10 seconds. Release the buttons when the Roomba makes a two-tone beeping sound, signaling the reset is complete.
Step 4: Evaluate the Battery
If all previous steps have failed, it is time to consider the battery itself.
When to Consider a Replacement
If your Roomba is several years old and its runtime has been steadily decreasing, the battery has likely reached the end of its life. A battery that can no longer hold a meaningful charge will also be unable to initiate the charging cycle correctly. If the Roomba works for only a few minutes before dying, even after being on the charger, a new battery is almost certainly needed.
How to Replace the Battery
If your Roomba 360 battery is no longer holding a charge, replacing it can restore your robot’s full runtime and charging capability.

High-quality lithium battery with 26Wh capacity for iRobot Roomba i and e series.

Upgraded 36Wh capacity battery for i7, i3, j7, e5, and e6 models.
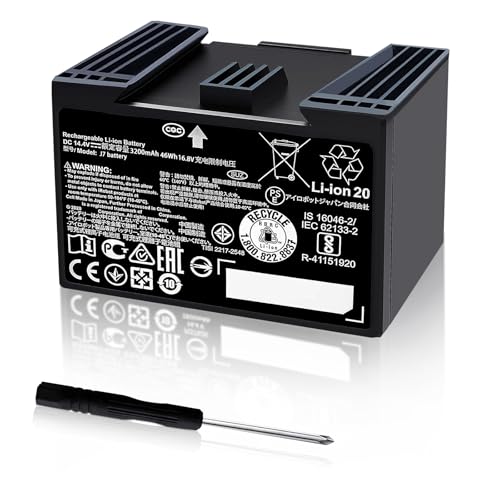
Premium 3200mAh battery for j7, i7, and i8 with fast charging support.

High-capacity Ni-MH battery for 500, 600, and 700 series with long runtime.
Proactive Maintenance to Prevent Charging Problems
The best way to fix a problem is to prevent it from happening in the first place. Regular maintenance will keep your Roomba 360 charging reliably for years to come. * Routine Cleaning: Make it a habit to wipe down the charging contacts on the robot and dock every few weeks. This simple act prevents the gradual buildup of performance-hindering grime. * Keep Firmware Updated: Enable automatic updates in the iRobot Home app or check for new versions manually on a regular basis. * Proper Placement: Keep the charging dock in an open, well-ventilated area to prevent the robot from overheating during charging. Crucially, ensure the dock is not placed near sources of water or other liquids that could cause electrical damage.
If your Roomba’s charging dock is damaged or no longer functioning, replacing it is essential for your Roomba to charge properly.

Official OEM replacement for Roomba 500-900 series with improved contacts

Affordable universal charging dock with global voltage support

Premium charging station with comprehensive accessory package
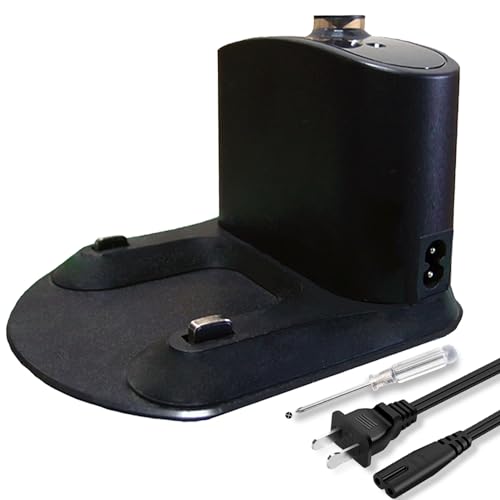
Value pack with cleaning accessories and 12-month warranty
When to Contact Customer Support

If you have meticulously followed all the troubleshooting steps in this guide and your Roomba 360 still refuses to charge, it may be time to call in the experts. A persistent issue could indicate a more serious internal hardware failure with the robot or the charging dock. When you contact iRobot customer support, be prepared to provide detailed information about the problem, the steps you have already taken, and any error messages the app or robot has displayed.
Frequently Asked Questions (FAQ)
What do the indicator lights mean when my Roomba 360 is charging?
When your Roomba is correctly docked and charging, it will typically show a pulsing amber or white light. A steady green light means it is fully charged and ready to clean. A blinking red light signals a charging error, indicating you should check the contacts, power supply, or other issues mentioned in this guide.
How do I properly clean the charging contacts?
Use a clean, dry, lint-free cloth to wipe the metal contacts on both the Roomba’s underside and the charging base. For more persistent dirt, a soft-bristled brush or a lightly dampened melamine foam sponge can be effective. Never use liquids or harsh chemical cleaners, and ensure the contacts are fully dry before use.
Will a factory reset fix my charging problem?
A factory reset can resolve charging issues caused by a software glitch. By clearing the robot’s memory and restoring its original settings, you can eliminate bugs that may be interfering with the charging cycle. To perform a reset, press and hold the “Clean” and “Spot” buttons together for 10 seconds until you hear a beep.
Conclusion
A Roomba 360 that won’t charge can bring your automated cleaning routine to a halt, but the solution is often within your reach. By methodically working through the troubleshooting steps—from checking the power supply and cleaning the contacts to updating firmware and resetting the software—you can address the most common causes of charging failure. In many cases, a few minutes of cleaning or a simple reset is all that is needed to get your device working again.
Remember that proactive maintenance is your best defense against future issues. By keeping your Roomba and its dock clean and its software up to date, you ensure its longevity and reliable performance. Should you exhaust all options, iRobot’s customer support is available to help with more complex hardware problems.