
The iRobot Roomba 400 series, a reliable workhorse in the world of robotic vacuums, can sometimes present a frustrating challenge: a failure to charge. Owners might place their device on its home base, expecting it to power up, only to be met with a flickering light, strange beeps, or simply no response at all. This common issue, often related to a lack of electrical continuity in the charging pads, can bring your automated cleaning routine to a sudden halt. Fortunately, this problem is frequently solvable with a bit of troubleshooting and maintenance.
This article provides a comprehensive guide to getting your Roomba 400 back in service. We will explore the various reasons your charging pad might be failing, from simple dirt accumulation to more complex electrical faults. You will learn a step-by-step diagnostic process, discover effective maintenance habits to prevent future issues, and even explore advanced solutions for persistent problems. By the end, you’ll be equipped with the knowledge to diagnose and resolve these charging continuity issues yourself.
Diagnosing Roomba 400 Charging Failures

When your Roomba 400 refuses to charge, the issue typically originates from a handful of common culprits. Pinpointing the exact cause is the first step toward an effective solution. The problem lies in the connection between the charging pad and the robot, which can be disrupted by several factors.
One of the most frequent causes is simply an accumulation of dirt and debris. Over time, the metal contacts on both the charging base and the underside of the Roomba can become coated with dust, hair, and other household grime. This buildup acts as an insulator, preventing electricity from flowing and charging the battery. Similarly, physical damage can sever this vital connection. Cracks in the charging pad or dents on the contacts can create gaps that disrupt the electrical circuit.
Beyond surface-level issues, wear and tear can take their toll. The metal contacts can wear down or become misaligned after years of use, leading to an inconsistent or failed connection. In other cases, the problem isn’t with the charging base at all but with the Roomba’s internal battery, which may have reached the end of its life and can no longer hold a charge. Finally, an underlying electrical failure, such as a faulty power supply or damaged internal wiring, can render the entire charging system inoperative.
A Step-by-Step Guide to Fixing Charging Issues
Follow this methodical approach to systematically identify and correct the problem with your Roomba 400’s charging system.
Step 1: Perform a Thorough Visual Inspection
Before you reach for any tools, a careful visual check can often reveal the source of the trouble.
Examine the Charging Pad
Carefully look over the surface of the charging pad. Do you see any obvious cracks, deep scratches, or dents, especially on or around the metal contact points? Any significant physical damage can interrupt the electrical flow and will likely require a more advanced repair or replacement.
Inspect the Roomba’s Contacts
Flip your Roomba over and inspect the two metal charging contacts on its underside. Check for any caked-on dirt, corrosion, or signs of physical wear. These contacts must be clean and smooth to make a solid connection with the base.
Check the Power Supply
Examine the power supply cord from the wall outlet to the charging pad. Look for any frays, cuts, or kinks in the cable. Ensure the plug is securely seated in both the wall socket and the port on the charging base. A loose connection is a simple but often overlooked cause of charging failure.
Step 2: Clean All Contact Points
If your inspection doesn’t reveal any damage, the next step is a thorough cleaning. This is the most common fix for charging issues.
How to Clean the Charging Pad
Use a dry, soft, lint-free cloth or a small, soft-bristled brush to gently wipe the metal contacts on the charging pad. Focus on removing any dust or film that has built up. It is critical to avoid using water, liquid cleaners, or abrasive materials, as these can damage the electronics or scratch the contacts.
How to Clean the Roomba’s Contacts
Using the same method, clean the contacts on the bottom of the Roomba. A dry cloth is usually sufficient, but for stubborn debris lodged in crevices, a small, dry brush can be very effective. Ensure the contacts are shiny and free of any residue.
Step 3: Verify Proper Alignment
Once everything is clean, placement is key. When you set the Roomba on its base, ensure it is positioned correctly. The contacts on the robot must align perfectly with the contacts on the pad. Sometimes, a slight nudge is all it takes to seat the device properly and initiate the charging cycle. You should hear a confirmation beep or see the charging indicator light turn on and remain steady.
Step 4: Test the Power Supply
If cleaning and realignment don’t work, the power supply itself could be faulty. First, plug the charging base into a different wall outlet that you know is working. This rules out a problem with the original socket. If it still doesn’t work, you can test the power supply with a multimeter if you have one. Set the multimeter to DC voltage and touch the probes to the appropriate points on the power supply’s connector. A healthy Roomba 400 power supply should provide a reading of approximately 19V DC. A significantly lower reading or no reading at all indicates the power supply needs to be replaced.
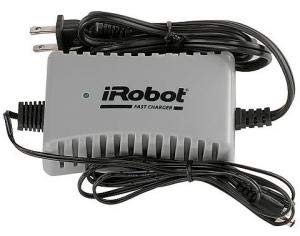
If your Roomba 400 is not charging, the power supply unit might be the culprit. A replacement power adapter can restore proper charging functionality.
Roomba 400 Series Power Supply
iRobot Roomba Power Charger

Official power charger for 500, 600, and 700 series.
T POWER 22V Charger

High-quality compatible charger for multiple Roomba series.
caSino187 Wall Charger
Fast power supply for 400 series Roombas.
JHZL 22.5v1.5a AC Adapter

Compact and widely compatible power supply.
Step 5: Conduct Battery Diagnostics
If the charging base and power supply seem to be working correctly, the issue may lie with the Roomba’s internal battery. An old or faulty battery may lose its ability to draw or hold a charge. Some Roomba models have built-in diagnostic modes that can provide information about battery health. Consult your user manual for instructions on how to access these modes. If the battery is identified as the problem, a replacement will be necessary.
If your Roomba 400 is no longer holding a charge or has a significantly reduced run time, a new battery is likely needed to restore its performance.
Roomba 400 Series Battery
iRobot XLife Battery

Official iRobot battery for 400 series
LabTEC Roomba 400 Battery

High-capacity replacement with protection features
Kastar Roomba 400 Battery
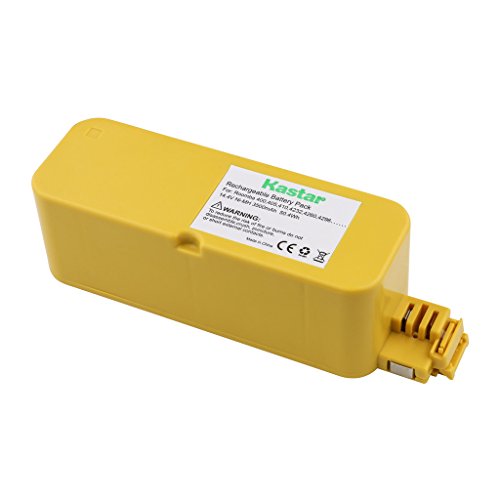
Durable battery with 30-day return
TREE.NB Roomba 400 Battery

High-capacity battery with global certification
Step 6: When to Seek Professional Help
If you have completed all the steps above and your Roomba still won’t charge, it may be time to seek expert assistance. An internal wiring issue or a more complex component failure may be the cause. You can contact iRobot customer support for guidance or consult a professional electronics repair service to diagnose and fix the problem.
Proactive Maintenance for Reliable Charging
Preventing charging problems is always better than fixing them. Adopting a few simple maintenance habits can ensure your Roomba 400 charges reliably for years to come.
- Implement a Regular Cleaning Schedule: Make it a habit to wipe down the charging contacts on both the Roomba and the charging pad every few weeks. This prevents the gradual buildup of grime that leads to poor conductivity.
- Handle with Care: Treat the charging pad gently. Avoid dropping it or placing heavy objects on it, as physical damage is a primary cause of failure.
- Check Your Connections: Periodically, take a moment to ensure the power cord is firmly plugged into both the wall and the charging base. Loose connections can cause intermittent charging.
- Keep Firmware Updated: If your specific model allows for it, keeping the Roomba’s firmware up to date can resolve software-related bugs that might affect charging performance and other functions.
Advanced Repair and Community-Sourced Tips
For those who are more technically inclined or when standard troubleshooting fails, there are a few advanced options to consider.
Sourcing and Installing Replacement Parts
If the charging contacts on either the base or the robot are visibly worn down, corroded, or damaged, they can often be replaced. You can source official replacement parts directly from iRobot or find compatible parts from third-party suppliers online. When replacing components, always follow the manufacturer’s instructions carefully to avoid causing further damage.
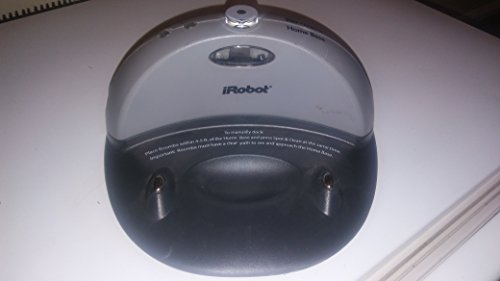
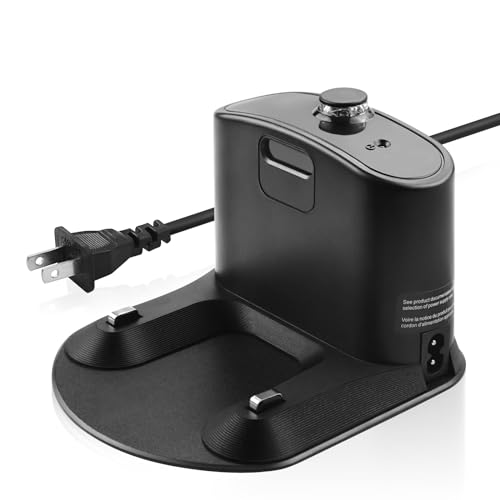
If the charging base itself is physically damaged, cracked, or its internal components are faulty, replacing the entire home base is often the most straightforward solution.
Roomba 400 Series Home Base
iRobot Roomba 400 Series Home Base

Official iRobot home base for Roomba 400 series with automatic docking.
iRobot Self-Charging Home Base 4931
Budget-friendly self-charging base compatible with Roomba 400 series.
caSino187 OEM Charging Dock

High-quality OEM replacement with improved charging contacts.
Roomba Charger Base for 400 Series
International compatible replacement charging base for Roomba 400 series.
DIY Repair for the Technically Inclined
Advanced users with experience in electronics repair may opt for DIY solutions. This could involve resoldering a loose wire on the charging pad’s circuit board or carefully rewiring a damaged power supply connection. These repairs require proper tools, technical knowledge, and a steady hand. Attempting them without the necessary expertise can be dangerous and may permanently damage your device.
Wisdom from the Roomba Community
Experienced Roomba users have shared several effective tips for improving charging connections.
* Use Compressed Air: A can of compressed air is excellent for blowing out dust and debris from the small crevices around the charging contacts that a cloth can’t reach.
* Apply Conductive Grease: For a more robust connection, some users apply a very thin layer of electrical conductive grease to the contacts. This specialty product can fill in microscopic pits and improve the flow of electricity, but it should be used sparingly.
To improve electrical contact and prevent corrosion on the charging points, especially if they show signs of wear or oxidation, applying a small amount of conductive grease can be beneficial.
Search term for Amazon: Electrical conductive grease
Frequently Asked Questions (FAQ)
What are the first signs my Roomba 400 charging pad is failing?
The earliest signs include an intermittently flickering charging light on the Roomba, the robot beeping erratically when placed on the base, or the device failing to start a cleaning cycle due to a low battery even after being docked for hours. Sometimes, the charging light may not turn on at all.
Is it safe to clean the charging contacts with liquids?
No, you should avoid using water or any liquid cleaners on the charging contacts. The official recommendation is to use only a dry, soft cloth or a dry brush. Introducing moisture can short-circuit the electronics and cause permanent damage to the charging pad or the Roomba itself.
What should I do if cleaning the contacts doesn’t solve the problem?
If a thorough cleaning doesn’t work, your next steps should be to verify the Roomba is properly aligned on the base, test the power supply by using a different wall outlet, and check the power cord for damage. If these steps fail, the issue may be with the power adapter or the Roomba’s internal battery.
Can I fix a physically damaged charging pad myself?
For minor issues, advanced users with electronics experience might attempt a DIY repair like soldering a loose wire. However, if the charging pad is cracked or severely damaged, the safest and most effective solution is to replace the unit or the specific damaged part, such as the contacts. For most users, seeking a replacement part or professional repair is the recommended course of action.
Conclusion
A Roomba 400 that won’t charge due to a continuity issue with its pads can be a major inconvenience, but it is rarely an unsolvable problem. In most cases, the solution is as simple as a thorough cleaning of the electrical contacts and ensuring the robot is correctly aligned on its base. By following a structured troubleshooting process—from visual inspection and cleaning to testing the power supply and battery—you can effectively diagnose and fix the issue.
Embracing regular maintenance habits is the best way to prevent these problems from recurring. For more persistent issues, replacement parts and professional assistance are reliable options. With the right approach, you can resolve these charging failures and ensure your Roomba 400 continues to keep your floors clean for a long time.