
Is your Roomba not performing as well as it used to? A dirty Roomba can lead to decreased suction, navigation issues, and even spread dust and debris around your home instead of cleaning it up. Regular cleaning and maintenance are essential to keep your robotic vacuum running smoothly and efficiently for years to come. This comprehensive guide will walk you through the process of how to clean a Roomba, ensuring it continues to provide optimal cleaning performance.
Maintaining a clean Roomba not only extends its lifespan but also ensures it effectively picks up dirt, dust, and pet hair. A well-maintained Roomba operates at peak performance, saving you time and effort. By following these simple steps, you can keep your Roomba in top condition and enjoy a cleaner home.
This guide covers everything from emptying the bin to cleaning the brushes and sensors. We’ll provide step-by-step instructions, helpful tips, and troubleshooting advice to make the process as easy as possible. Let’s dive in and learn how to clean your Roomba properly!
Emptying the Roomba’s Dust Bin
The first and most frequent task in Roomba maintenance is emptying the dust bin. This should be done after each cleaning session or at least every few uses, depending on how much debris your Roomba collects.
- Remove the Dust Bin: Locate the dust bin release button on your Roomba. It’s usually on the back or side. Press the button and pull out the dust bin.
- Empty the Debris: Hold the dust bin over a trash can and open the bin door to empty the contents. Some models have a release button or latch to open the door.
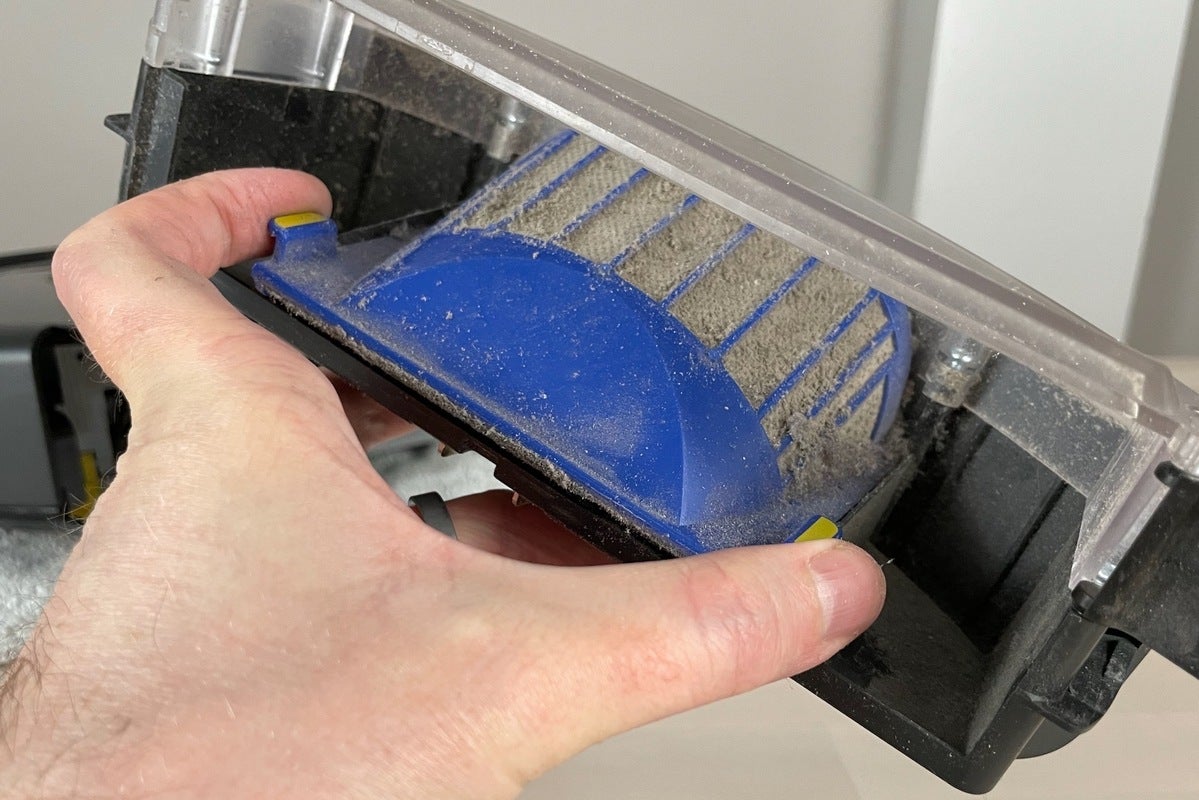
- Clean the Filter: Remove the filter from the dust bin. Gently tap the filter against the inside of the trash can to dislodge any loose dust and debris. For a more thorough clean, you can use a soft brush or a can of compressed air. Note: Never wash the filter with water unless it is a washable filter.
- Rinse the Dust Bin (Optional): If the dust bin is particularly dirty, you can rinse it with water. Ensure it is completely dry before reinserting it into the Roomba.
- Reassemble and Reinsert: Place the filter back into the dust bin, then slide the dust bin back into the Roomba until it clicks into place.
Cleaning the Roomba’s Brushes
The brushes are crucial for picking up dirt and debris, so keeping them clean is essential. Hair, threads, and other debris can easily get tangled in the brushes, reducing their effectiveness.
- Remove the Brushes: Flip the Roomba over and locate the brush guard. Remove the screws or clips holding it in place and take off the guard. Lift out the brushes.
- Remove Debris: Clear any hair, threads, or debris tangled around the brushes. You can use your fingers, scissors, or the cleaning tool that came with your Roomba to cut and remove the tangled material.
- Clean the Brush Ends: Remove the brush end caps and clean any debris that may have accumulated there. This helps ensure the brushes spin freely.
- Reinstall the Brushes: Place the cleaned brushes back into the Roomba, ensuring they are properly seated. Reattach the brush guard and secure it with the screws or clips. If the brushes are too worn or damaged, see Roomba replacement brushes on Amazon to find compatible replacements.
Cleaning the Multi-Surface Brushes
Newer Roomba models often come with multi-surface rubber brushes instead of the traditional bristle brushes. These brushes require similar cleaning but are generally easier to maintain.
- Remove the Brushes: Open the brush frame by lifting the tab on the side of the Roomba. Remove the brushes.
- Remove Debris: Inspect the brushes for hair, string, or other debris. Pull the debris off the brushes by hand.
- Clean the Brush Ends: Remove the end caps from the brushes and clean any accumulated debris.
- Reinstall the Brushes: Place the brushes back into the Roomba, ensuring the end caps are properly aligned. Close the brush frame until it clicks into place.
Cleaning the Roomba’s Wheels

The Roomba’s wheels can accumulate dirt and hair, which can affect its ability to navigate properly. Cleaning the wheels ensures smooth movement and prevents navigation issues.
- Inspect the Wheels: Check the side wheels and the front caster wheel for any visible dirt or debris.
- Clean the Side Wheels: Use a small brush or cloth to remove any dirt or hair from the side wheels. Make sure they can spin freely.
- Clean the Caster Wheel: The front caster wheel is prone to collecting hair and debris. Remove the caster wheel from the Roomba. Clean the wheel housing and remove any tangled hair or debris from the wheel itself.
- Reinstall the Caster Wheel: Once the caster wheel is clean, reinsert it back into the Roomba until it clicks into place.If the wheel is damaged or too worn, see Roomba replacement caster wheels on Amazon for compatible parts.
Cleaning the Roomba’s Sensors

The sensors are essential for the Roomba to navigate your home effectively, avoid obstacles, and prevent falls. Dirty sensors can lead to erratic behavior and missed spots.
- Locate the Sensors: The sensors are located on the bottom and front of the Roomba. They appear as small windows or lenses.
- Wipe the Sensors: Use a clean, dry microfiber cloth to gently wipe the sensors. Avoid using any liquids or abrasive cleaners, as these can damage the sensors.
- Clean the Cliff Sensors: Pay special attention to the cliff sensors on the bottom of the Roomba. These prevent the Roomba from falling down stairs. Ensure they are free of dust and debris.
Practical Tips for Roomba Maintenance
Here are some practical tips to keep your Roomba in top shape:
- Regular Cleaning Schedule: Set a regular cleaning schedule for your Roomba, including emptying the dust bin, cleaning the brushes, and wiping the sensors.
- Use Virtual Walls or Keep Out Zones: If there are areas you don’t want your Roomba to go, use virtual walls or set up keep-out zones in the app.
- Pre-Cleaning: Before running your Roomba, pick up any small objects, cords, or loose rugs that could get tangled in the brushes.
- Check for Updates: Regularly check for software updates in the iRobot app to ensure your Roomba has the latest features and improvements.
Troubleshooting Common Roomba Problems
Here are some common Roomba problems and how to troubleshoot them:
- Roomba Not Cleaning Effectively:
- Problem: Roomba leaves behind dirt and debris.
- Solution: Empty the dust bin, clean the brushes, and check the filter. Ensure the brushes are spinning freely.
- Roomba Not Navigating Properly:
- Problem: Roomba bumps into walls or gets stuck in certain areas.
- Solution: Clean the sensors and wheels. Use virtual walls or keep-out zones to prevent the Roomba from entering problematic areas.
- Roomba Making Loud Noises:
- Problem: Roomba is making unusual or loud noises during operation.
- Solution: Check the brushes for tangled debris. Remove any obstructions and clean the brush ends.
- Roomba Not Charging:
- Problem: Roomba is not charging when placed on the charging dock.
- Solution: Ensure the charging contacts on the Roomba and the dock are clean. Try resetting the Roomba by holding down the power button for 20 seconds.
- Roomba Displaying Error Messages:
- Problem: Roomba is displaying error messages on the app or the robot itself.
- Solution: Consult the Roomba manual or the iRobot website for specific error code solutions.
FAQ
How often should I clean my Roomba’s brushes?
Clean the brushes at least once a week, or more frequently if you have pets or notice a buildup of hair and debris. Regular cleaning ensures optimal performance.
Can I wash the Roomba filter with water?
Only wash the filter with water if it is specifically designed as a washable filter. Standard filters should only be tapped clean or gently brushed. Washing a non-washable filter can damage it.
How do I clean the Roomba’s charging contacts?
Use a clean, dry cloth to wipe the charging contacts on both the Roomba and the charging dock. This ensures a good connection for charging.
What should I do if my Roomba gets stuck under furniture?
Use virtual walls or keep-out zones to prevent the Roomba from going under low-clearance furniture. You can also raise the furniture slightly to provide more clearance.
How do I reset my Roomba?
To reset your Roomba, hold down the power button for about 20 seconds. This can help resolve minor software glitches and improve performance.
How can I improve my Roomba’s battery life?
Ensure the charging contacts are clean, and allow the Roomba to fully charge before use. Regularly clean the Roomba to reduce the load on the motor and battery.
Tips, Warnings, and Best Practices for Maintaining Your Roomba
- Avoid Water Damage: Never submerge the Roomba or its components in water, except for the dust bin (when rinsing).
- Use Genuine Replacement Parts: When replacing parts, use genuine iRobot replacement parts to ensure compatibility and performance.
- Regular Filter Replacement: Replace the filter every 2-3 months, or more frequently if you have allergies or pets.
- Monitor Brush Wear: Check the brushes regularly for wear and tear. Replace them when they become worn or damaged.
- Keep Charging Dock Clear: Ensure the charging dock is in a clear, accessible location.
- Read the Manual: Always refer to the Roomba manual for specific instructions and safety guidelines.
Conclusion
Keeping your Roomba clean is essential for maintaining its performance and extending its lifespan. By following this guide on how to clean a Roomba, you can ensure that your robotic vacuum continues to provide efficient and effective cleaning for your home. From emptying the dust bin to cleaning the brushes and sensors, each step contributes to a cleaner, healthier home environment.
Now that you know how to clean a Roomba, take the time to implement these practices regularly. Your Roomba will thank you with consistent, reliable cleaning, and you’ll enjoy a cleaner home with minimal effort. So, go ahead and give your Roomba the care it deserves!