
Is your Roomba not cleaning as effectively as it used to? Are you noticing more debris left behind, or is your Roomba struggling to navigate your floors? One of the most common culprits for these issues is worn-out rollers. The rollers, also known as brushes or extractors, are essential for picking up dirt, dust, and debris from your floors. Over time, they can wear down, become tangled with hair, or simply lose their effectiveness. Replacing them is a simple maintenance task that can significantly improve your Roomba’s cleaning performance. This guide provides a comprehensive walkthrough on how to replace your Roomba’s rollers, ensuring your robotic vacuum continues to keep your home clean.
1. Identify Your Roomba Model and Purchase the Correct Replacement Rollers
Before you begin, it’s crucial to identify your Roomba model. Replacement rollers vary depending on the series (e.g., 600, 800/900, e-series, i-series, j-series). You can usually find the model number on the bottom of the Roomba or inside the battery compartment. Once you know the model, purchase the correct replacement rollers. You can find them on the iRobot website, Amazon, or other retailers. Ensure you’re buying authentic iRobot parts or high-quality compatible replacements to guarantee optimal performance and longevity.
2. Gather Your Tools and Prepare Your Workspace
Replacing Roomba rollers is a straightforward process that requires minimal tools. Here’s what you’ll need:
- New Replacement Rollers: Ensure they are compatible with your Roomba model.
- Screwdriver (if needed): Some Roomba models require a screwdriver to remove the side brush, which may need to be moved for access. A flathead or Phillips head screwdriver might be necessary.
- Cleaning Brush or Cloth: To clean any debris or hair from the Roomba’s components.
- Soft Surface: A towel or mat to protect your Roomba during the replacement process.
3. Step-by-Step Guide to Replacing Roomba Rollers
Here’s a general guide to replacing the rollers. Note that specific steps may vary slightly depending on your Roomba model, so always refer to your Roomba’s manual for detailed instructions.
- Power Off: Turn off your Roomba to prevent any accidental operation during the replacement.
- Flip the Roomba Over: Place the Roomba upside down on a soft, clean surface to access the bottom components.
- Remove the Brush Guard: Most Roomba models have a brush guard or a cover that protects the rollers. This is usually a rectangular piece of plastic held in place by one or two clips or latches.
- Locate the clips or latches on the brush guard.
- Squeeze or lift the clips to release the brush guard.
- Gently remove the brush guard.
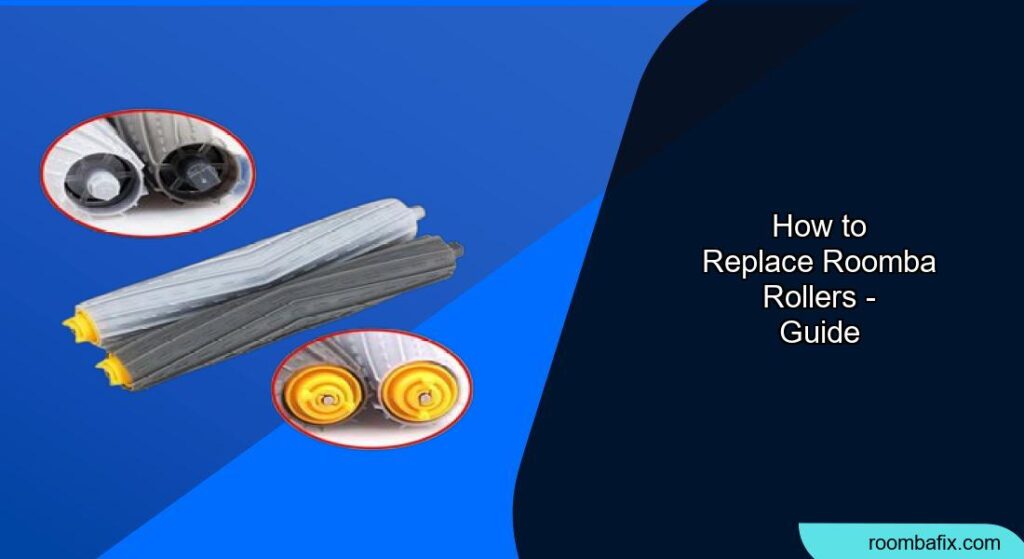
- Remove the Old Rollers:
- Lift the old rollers out of the Roomba. Some models have yellow bearings at the end of the rollers; make sure to remove these as well.
- Inspect the roller compartment for any accumulated hair, debris, or dirt.
- Clean the Roller Compartment: Use a cleaning brush or cloth to remove any debris from the roller compartment, including the yellow bearings (if applicable).
- Install the New Rollers:
- Insert the new rollers into the Roomba. Make sure they are properly aligned and seated in their designated slots.
- If your Roomba has yellow bearings, ensure they are correctly placed on the ends of the rollers. The rollers are color-coded. The light green square will go on the light green square side, and the dark green hexagon will go on the dark green hexagon side.
- Reattach the Brush Guard:
- Align the brush guard with the roller compartment.
- Press down on the brush guard until the clips or latches click into place, securing it.
- Replace the Side Brush (If Removed): If you removed the side brush for access, align it with the hexagonal hub and use a screwdriver to reattach it.
- Power On: Turn your Roomba back on and run a cleaning cycle to ensure the new rollers are functioning correctly.
4. Troubleshooting Common Issues
Even with careful execution, you might encounter some issues during the roller replacement process. Here are a few common problems and their solutions:
- Rollers Not Spinning:
- Problem: The rollers are correctly installed, but the Roomba reports a “rollers not spinning” error.
- Solution: Ensure the rollers are not obstructed by any debris or hair. Clean the roller compartment and the rollers themselves thoroughly. Also, check the motor that drives the rollers for any damage or obstructions.
- Rollers Too Snug:
- Problem: The new rollers are difficult to fit into the Roomba.
- Solution: Double-check that you’ve purchased the correct rollers for your Roomba model. If they are the correct size, ensure the roller compartment is clean and free of any obstructions.
- Roomba Not Picking Up Debris:
- Problem: After replacing the rollers, the Roomba is not effectively picking up dirt and debris.
- Solution: Ensure the rollers are properly installed and are making full contact with the floor. Check the Roomba’s suction power and clean the filter if necessary.
- Brush Guard Difficult to Reattach:
- Problem: The brush guard does not clip back in
- Solution: Inspect the brush guard and roller compartment for obstructions. Ensure the rollers are seated correctly.
5. Pro Tips for Roomba Roller Maintenance
- Regular Cleaning: Clean the rollers regularly (at least once a month) to remove hair, debris, and dirt. This will extend their lifespan and maintain optimal cleaning performance.
- Hair Removal: Use a dedicated cleaning tool or scissors to carefully remove tangled hair from the rollers.
- Inspect for Wear: Regularly inspect the rollers for signs of wear and tear, such as cracks, fraying, or reduced bristle length. Replace them as needed.
- Battery Maintenance: While replacing the rollers, consider checking the Roomba’s battery. Ensure it’s clean and properly connected. iRobot recommends only using iRobot batteries and making sure the Roomba is charged at room temperature and out of direct sunlight for optimal performance.
FAQ
How often should I replace my Roomba rollers?
The lifespan of Roomba rollers depends on usage frequency and the type of flooring in your home. As a general guideline, replace the rollers every 6-12 months. If you have pets or use your Roomba daily, you may need to replace them more frequently.
Can I use third-party rollers, or should I only use iRobot’s official rollers?
While third-party rollers are often cheaper, authentic iRobot rollers are designed specifically for your Roomba model and will likely provide better performance and longevity. If you choose to use third-party rollers, research to ensure they are high-quality and compatible with your Roomba.
What happens if I don’t replace my Roomba rollers?
If you don’t replace your Roomba rollers when they are worn out, your Roomba’s cleaning performance will suffer. It may not pick up as much dirt and debris, leaving your floors less clean. Worn rollers can also put a strain on the Roomba’s motor, potentially shortening its lifespan.
How do I clean the Roomba rollers?
To clean the rollers, remove them from the Roomba and use a cleaning tool or scissors to remove any hair or debris. You can also wash them with mild soap and water, but ensure they are completely dry before reinstalling them.
Why is my Roomba making a loud noise after I replaced the rollers?
A loud noise after replacing the rollers could indicate that they are not installed correctly or that there is an obstruction in the roller compartment. Double-check the installation and ensure no debris is present.
Can I replace just one roller, or do I need to replace both?
It’s generally recommended to replace both rollers simultaneously, even if only one appears worn. This ensures balanced cleaning performance and prevents uneven wear on the Roomba’s motor.
Conclusion
Replacing your Roomba’s rollers is a simple yet essential maintenance task that can significantly improve its cleaning performance and extend its lifespan. By following this comprehensive guide, you can easily replace the rollers yourself and keep your Roomba running like new.
Remember to choose the correct replacement rollers for your model, clean the roller compartment regularly, and address any issues promptly. Regular Roomba roller maintenance ensures your robot vacuum remains an effective tool in keeping your home clean and tidy. So, take the next step and make sure that you inspect and replace your Roomba rollers today!