
Is your Roomba’s cleaning performance suffering due to tangled hair in its brushes? Don’t worry, you’re not alone! Hair, especially from pets and long-haired individuals, can quickly accumulate and hinder your Roomba’s ability to effectively clean your floors. This guide provides a comprehensive, step-by-step approach to removing hair from your Roomba’s brushes, ensuring it continues to operate at peak performance. Regular cleaning not only improves cleaning efficiency but also prolongs the lifespan of your Roomba.
1. Preparation Steps Before You Start
Before diving into the cleaning process, gather the necessary tools and prepare your workspace. This will streamline the process and make it more efficient.
- Cleaning Tools: Have a Roomba cleaning tool (if included with your model), scissors, a seam ripper, tweezers, and a small brush or old toothbrush.
- Workspace: Choose a well-lit area where you can comfortably work. A table covered with paper towels or an old cloth can help contain the mess.
- Gloves (Optional): If you’re sensitive to dust or debris, consider wearing gloves.
2. Accessing the Roomba Brushes

The first step is to access the brushes that need cleaning. The process varies slightly depending on your Roomba model, but here’s a general guide:
- Power Off: Turn off your Roomba to prevent accidental operation during cleaning.
- Flip the Roomba: Gently turn your Roomba upside down, exposing the brush compartment.
- Release the Brush Guard: Locate the brush guard, which is a protective cover over the brushes. Most models have tabs or levers that you need to press or lift to release the guard.
- Remove the Brushes: Once the guard is open, carefully remove the brushes. Note their orientation for easy reinstallation later.
3. Removing Hair from the Main Brushes
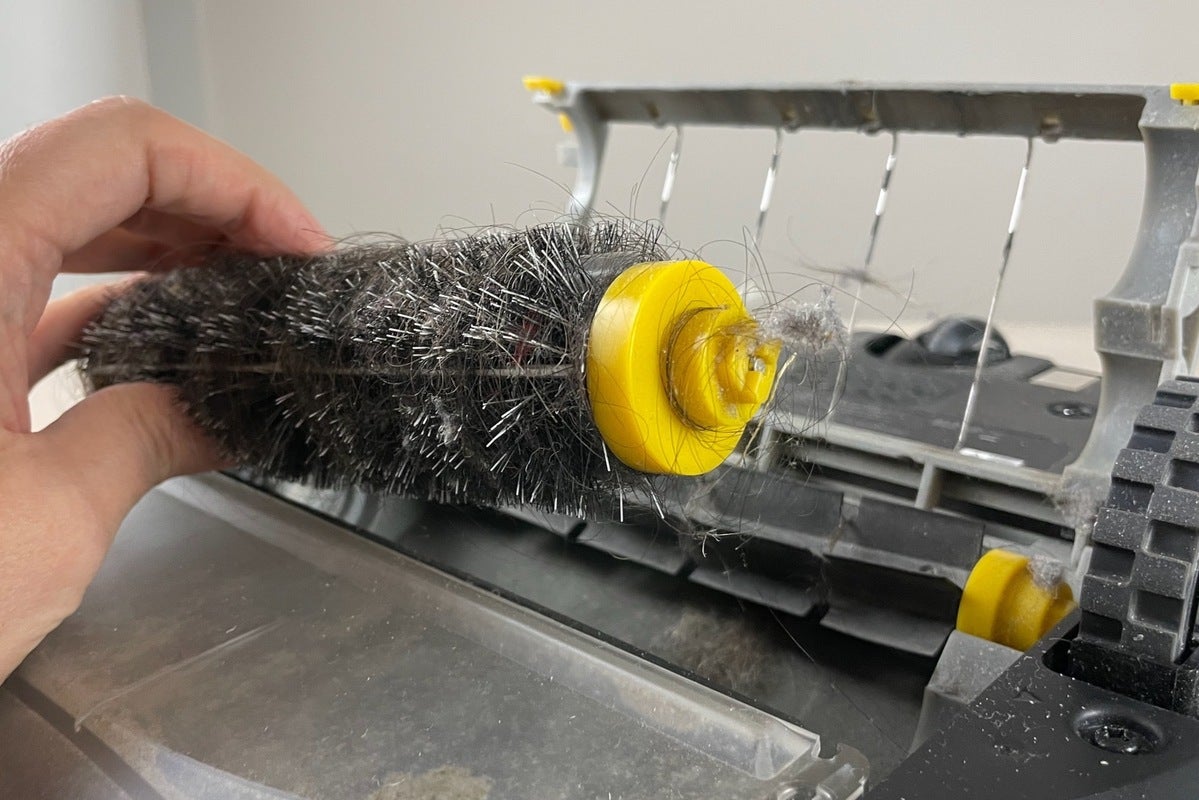
The main brushes (usually two, one bristle brush and one rubber brush) are the primary targets for hair accumulation. Here’s how to clean them:
- Initial Inspection: Examine the brushes to see how the hair is tangled.
- Cutting Away Hair: Use scissors or a seam ripper to carefully cut away the bulk of the hair wrapped around the brush. Be gentle to avoid damaging the bristles or rubber fins. A seam ripper, commonly found in sewing kits, is particularly effective for getting into tight spaces.
- Removing Remaining Hair: Use the Roomba cleaning tool, tweezers, or your fingers to pull out the remaining hair and debris. A dog grooming comb can also be very effective.
- Cleaning Brush Ends: Pay close attention to the ends of the brushes, where hair tends to accumulate around the bearings. Remove the bearings (usually yellow plastic pieces) and clean thoroughly around and under them.
- Wipe Down: Use a damp cloth to wipe down the brushes and remove any lingering dust or debris.
4. Cleaning the Side Brush
The side brush, responsible for cleaning edges and corners, also collects hair. Here’s how to clean it:
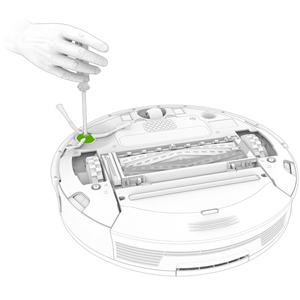
- Unscrew the Brush: Use a screwdriver or coin to loosen and remove the screw holding the side brush in place.
- Remove the Brush: Gently pull the side brush away from the Roomba.
- Remove Hair: Use your fingers, tweezers, or a small brush to remove any hair or debris wrapped around the brush and its post.
- Reinstall: Reattach the side brush and tighten the screw, being careful not to overtighten.
5. Cleaning the Brush Compartment
While the brushes are removed, take the opportunity to clean the brush compartment itself:
- Remove Debris: Use a small brush or vacuum cleaner to remove any loose hair, dust, or debris from the compartment.
- Wipe Down: Wipe the compartment with a damp cloth to remove any remaining dirt.
- Check Vacuum Path: Ensure that the vacuum path is clear of any obstructions.
6. Reassembling the Roomba
Once everything is clean, it’s time to reassemble your Roomba:
- Reinstall Brushes: Place the main brushes back into their slots, ensuring they are correctly oriented. Match the shape of the brush pegs with the shapes in the cleaning head module.
- Reattach Brush Guard: Close the brush guard and ensure it clicks securely into place.
- Turn Roomba Right Side Up: Gently flip your Roomba back to its upright position.
7. Troubleshooting Common Problems
Even with careful cleaning, you might encounter some issues:
- Brushes Not Spinning: If the brushes don’t spin after cleaning, double-check that they are properly installed and that the brush guard is securely closed. Also, ensure that there is no remaining hair or debris obstructing the brush’s movement.
- Roomba Not Picking Up Dirt: If your Roomba isn’t picking up dirt as effectively, the brushes may still be clogged or worn. Consider replacing the brushes if they are old or damaged. iRobot recommends replacing the main brushes every 6-12 months, or more frequently if you have pets.
- Unusual Noises: Strange noises can indicate that something is still stuck in the brushes or that a bearing is damaged. Disassemble and inspect the brushes again.
8. Pro Tips for Maintaining Clean Roomba Brushes
Here are some pro tips to keep your Roomba brushes clean and extend their lifespan:
- Regular Cleaning: Clean the brushes every 1-3 uses, depending on the amount of hair and debris in your home.
- Hair Prevention: If possible, try to minimize the amount of hair on your floors by regular sweeping or vacuuming with a traditional vacuum cleaner.
- Use a Furminator: A Furminator pet brush can be used to effectively remove hair from the brushes without damaging the bristles.
- Replace Worn Brushes: Replace the brushes when they show signs of wear or damage.
9. FAQ
How often should I clean my Roomba brushes?
It’s best to clean your Roomba’s brushes every 1-3 uses, depending on the amount of hair and debris in your home. If you have pets or long-haired individuals in your household, you may need to clean them more frequently.
What tools are best for removing hair from Roomba brushes?
Scissors, a seam ripper, tweezers, and the Roomba cleaning tool (if included) are all effective for removing hair. A small brush or old toothbrush can also be helpful for cleaning the brush compartment.
Can I wash my Roomba brushes with water?
Yes, you can rinse the brushes with water to remove any lingering dust or debris. Make sure to dry them thoroughly before reinstalling them in the Roomba.
How do I prevent hair from getting tangled in my Roomba brushes?
Regular cleaning is the best way to prevent hair from accumulating. Additionally, try to minimize the amount of hair on your floors by regular sweeping or vacuuming with a traditional vacuum cleaner.
What happens if I don’t clean my Roomba brushes regularly?
If you don’t clean your Roomba brushes regularly, hair and debris can accumulate and hinder the Roomba’s ability to effectively clean your floors. This can also put strain on the Roomba’s motor and shorten its lifespan.
How do I know when it’s time to replace my Roomba brushes?
Replace the brushes when they show signs of wear or damage, such as frayed bristles or cracked rubber fins. iRobot recommends replacing the main brushes every 6-12 months, or more frequently if you have pets.
10. Tips, Warnings, and Best Practices
- Safety First: Always power off and unplug your Roomba before cleaning or performing any maintenance.
- Gentle Cleaning: Avoid using excessive force when cleaning the brushes, as this can damage the bristles or rubber fins.
- Proper Reassembly: Ensure that all parts are properly reassembled before using the Roomba.
- Regular Maintenance: In addition to cleaning the brushes, regularly empty the dustbin and clean the filter to maintain optimal performance.
Conclusion
Removing hair from your Roomba brushes is a simple but essential maintenance task that ensures your robot vacuum continues to clean effectively. By following these steps and tips, you can keep your Roomba in top condition and enjoy clean floors for years to come. Make sure to clean Roomba brushes regularly, and with just a little effort, you can keep your Roomba running smoothly and efficiently!