

Is your Roomba acting up, bumping into things, or missing spots? Dirty sensors are often the culprit. Cleaning Roomba sensors is a simple maintenance task that can significantly improve your robot vacuum’s performance and extend its lifespan. By keeping these sensors clean, you ensure that your Roomba navigates efficiently and cleans your floors effectively.
This article will guide you through the process of cleaning Roomba sensors, providing detailed instructions and helpful tips to keep your robot vacuum in top condition. We’ll cover everything from identifying the different sensors to troubleshooting common issues, ensuring you get the most out of your Roomba. Follow these steps, and you’ll have your Roomba back to its optimal cleaning performance in no time.
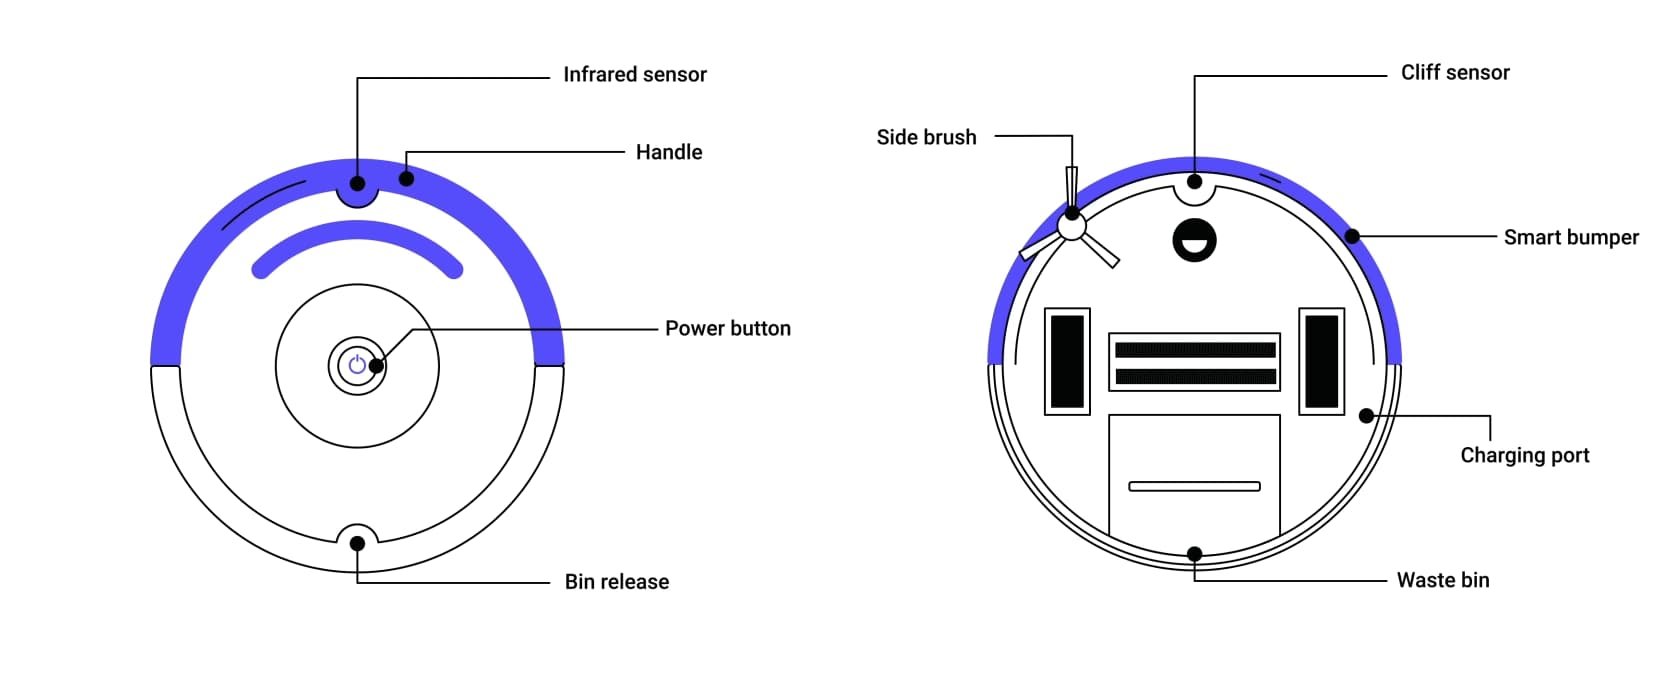
Identifying Roomba Sensors

Before you begin cleaning, it’s essential to know where the sensors are located on your Roomba. Here are the primary sensors you should focus on:
- Cliff Sensors: Located on the bottom of the Roomba, near the edges. These sensors prevent the Roomba from falling down stairs or off ledges.
- Wall Following Sensor: Typically located on the side of the Roomba. This sensor allows the Roomba to follow along walls and edges for thorough cleaning.
- IR (Infrared) Sensors: Found on the front bumper. These help the Roomba detect obstacles and navigate around them.
- Charging Sensors: These sensors are near the charging contacts and help the Roomba locate its base.
Preparation Steps Before Cleaning
Before diving into the cleaning process, a little preparation can make things smoother and safer for your Roomba. Here’s what you should do:
- Turn off the Roomba: Power off your Roomba to prevent any accidental starts during cleaning.
- Gather Supplies: You’ll need a clean, dry microfiber cloth, cotton swabs, and possibly a can of compressed air. Avoid using water or cleaning solutions, as these can damage the sensors.
- Choose a Workspace: Select a well-lit area where you can comfortably access all parts of the Roomba.
- Consult the Manual: Check your Roomba’s user manual for specific cleaning instructions or recommendations.
Step-by-Step Guide to Cleaning Roomba Sensors
Now that you’ve prepared, follow these steps to clean your Roomba’s sensors effectively:
-
Clean the Cliff Sensors:
- Turn the Roomba upside down to access the cliff sensors.
- Use a clean, dry microfiber cloth to gently wipe each sensor.
- If there’s stubborn debris, use a cotton swab to carefully dislodge it.
- Ensure the sensors are free from dust and dirt before moving on.
-
Clean the Wall Following Sensor:
- Locate the wall following sensor on the side of the Roomba.
- Wipe the sensor with a clean microfiber cloth to remove any accumulated dust or debris.
- Use a cotton swab for hard-to-reach areas or stubborn dirt.
-
Clean the IR Sensors:
- Locate the IR sensors on the front bumper of the Roomba.
- Use a dry microfiber cloth to wipe the sensors gently.
- For any stuck-on particles, use a cotton swab to carefully clean around the sensors.
- Make sure these sensors are clean to ensure proper obstacle detection.
-
Clean the Charging Sensors:
- Find the charging sensors near the charging contacts on the Roomba.
- Use a microfiber cloth or cotton swab to clean these sensors.
- Clear any dust or debris to ensure the Roomba can effectively find and connect with its charging base.
Pro Tips for Maintaining Roomba Sensors
To keep your Roomba sensors in optimal condition, consider these pro tips:
- Regular Cleaning: Clean the sensors at least once a month, or more frequently if you have pets or live in a dusty environment.
- Avoid Liquids: Never use water or cleaning solutions directly on the sensors. Moisture can damage the electronic components.
- Compressed Air: Use compressed air to blow away dust and debris from hard-to-reach areas, but use it sparingly.
- Gentle Touch: Always handle the sensors with care. Avoid applying too much pressure, which can damage them.
Troubleshooting Common Roomba Sensor Issues
Even with regular cleaning, you may encounter some issues with your Roomba’s sensors. Here are a few common problems and how to troubleshoot them:
- Roomba keeps falling down stairs: Ensure the cliff sensors are clean and not obstructed. If the problem persists, try moving the charging base to a different location.
- Roomba bumps into walls and furniture: Clean the IR sensors on the front bumper. If the issue continues, reset the Roomba by removing and reinserting the battery.
- Roomba isn’t following walls properly: Clean the wall following sensor on the side of the Roomba. Also, make sure there are no bright lights or mirrors interfering with the sensor.
- Roomba can’t find its base: Clean the charging sensors and ensure the charging base is placed in an open area, free from obstructions.
Alternatives to Traditional Cleaning Methods

While microfiber cloths and cotton swabs are generally effective, here are some alternative methods you might consider:
- Sensor Cleaning Kits: Some companies offer specialized cleaning kits for robot vacuum sensors. These kits usually include brushes and solutions designed specifically for electronic components.
- Electronic Contact Cleaner: If you’re comfortable using chemical cleaners, an electronic contact cleaner can help remove stubborn residue. Always apply the cleaner to a cloth first, rather than directly to the sensor.
Tips, Warnings, and Best Practices
To ensure the longevity and efficiency of your Roomba, keep these additional tips and warnings in mind:
- Read the Manual: Always refer to your Roomba’s user manual for specific cleaning and maintenance instructions.
- Avoid Abrasive Materials: Do not use abrasive cloths or harsh chemicals, as these can scratch or damage the sensors.
- Regular Maintenance: In addition to cleaning the sensors, regularly clean the brushes, wheels, and dustbin to keep your Roomba running smoothly.
- Professional Servicing: If you encounter persistent issues or are uncomfortable performing the cleaning yourself, consider seeking professional servicing.
FAQ
What happens if I don’t clean my Roomba sensors?
If you don’t clean your Roomba sensors regularly, dust and debris can accumulate, leading to impaired navigation and cleaning performance. The Roomba may start bumping into obstacles, missing spots, or even failing to recognize stairs, posing a safety risk.
How often should I clean the sensors on my Roomba?
Ideally, you should clean your Roomba’s sensors at least once a month. However, if you have pets, allergies, or live in a particularly dusty environment, consider cleaning them more frequently, such as every two weeks.
Can I use water or cleaning solutions to clean the sensors?
No, you should never use water or cleaning solutions directly on the Roomba’s sensors. Moisture can damage the electronic components and lead to malfunctions. Always use a dry microfiber cloth or cotton swab for cleaning.
How do I know if my Roomba sensors need cleaning?
Signs that your Roomba sensors need cleaning include erratic behavior, such as bumping into walls, missing spots, failing to recognize stairs, or having difficulty docking. Regular visual inspection can also help you identify dust or debris buildup.
What type of cloth is best for cleaning Roomba sensors?
A clean, dry microfiber cloth is the best choice for cleaning Roomba sensors. Microfiber cloths are gentle, non-abrasive, and effective at removing dust and debris without leaving residue.
Is it safe to use compressed air to clean Roomba sensors?
Yes, it is generally safe to use compressed air to clean Roomba sensors, but use it sparingly and from a distance. Avoid holding the nozzle too close to the sensors, as the high pressure can potentially damage them.
Conclusion
Cleaning Roomba sensors is a straightforward yet crucial task for maintaining your robot vacuum’s performance. By following the steps outlined in this guide, you can ensure your Roomba navigates effectively, cleans thoroughly, and avoids potential hazards. Regular maintenance, including sensor cleaning, will not only improve your Roomba’s efficiency but also extend its lifespan.
So, take a few minutes each month to clean those sensors, and enjoy a cleaner, smarter home with your trusty Roomba. Don’t wait—give your Roomba the care it deserves and experience the difference clean sensors can make.