
Is your Roomba s9 not cleaning as effectively as it used to? Are you noticing more dirt and debris left behind? One of the most common reasons for this decline in performance is worn-out brushes. Over time, the brushes on your Roomba s9 can accumulate hair, dirt, and other debris, hindering their ability to effectively sweep and agitate surfaces. Replacing them is a simple maintenance task that can significantly improve your Roomba’s cleaning power. This guide will walk you through the process of changing the brushes on your Roomba s9, ensuring it continues to deliver optimal cleaning performance.
1. Identifying the Brushes on Your Roomba s9

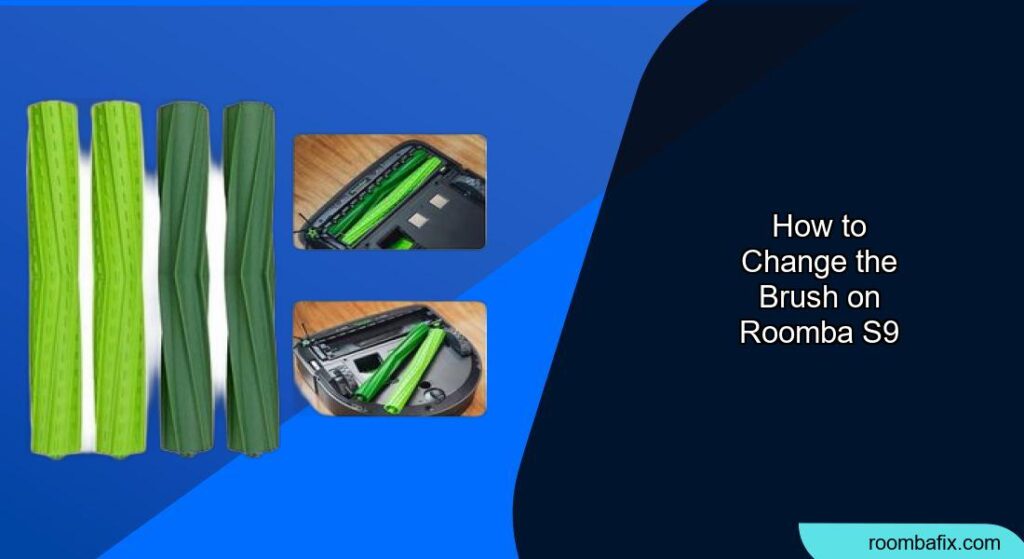
The Roomba s9 has two main types of brushes that you might need to change:
- Multi-Surface Rubber Brushes: These are the two large, counter-rotating rubber brushes located on the bottom of the Roomba. They work together to loosen and lift dirt, debris, and pet hair from various floor types.
- Edge Sweeping Brush: This is the small, three-armed brush located on the side of the Roomba. Its purpose is to sweep dirt and debris from edges and corners into the path of the main brushes.
2. Preparation Steps Before Changing the Brushes
Before you begin, gather the necessary tools and materials:
- Replacement Brushes: Ensure you have the correct replacement brushes specifically designed for the Roomba s9 model. You can purchase these from the iRobot website, authorized retailers, or online marketplaces.
- Screwdriver: You’ll need a small Phillips head screwdriver to remove the edge sweeping brush.
- Cleaning Tool (Optional): A small brush or cleaning tool can help remove hair and debris from the brush cavity.
- Clean Surface: Choose a well-lit and clean surface to work on.
3. Step-by-Step Guide to Changing the Multi-Surface Rubber Brushes
These are the main brushes on your Roomba S9
- Turn off the Roomba and flip it over: Ensure the Roomba is powered off before you begin. Place it upside down on a flat surface.
- Locate the brush frame release tab: Find the brush frame release tab on the right side of the cleaning head module.
- Release the brush frame: Press the tab to lift up the latch and release the brush frame.
- Remove the brushes: Carefully remove the brushes from the robot.
- Clean the brush caps: Remove the brush caps from the ends of the brushes and clean any hair or debris that has collected beneath the caps.
- Clean the brush pegs: Remove any hair or debris from the square and star pegs on the opposite side of the brushes.
- Reinstall the brush caps: Put the brush caps back onto the ends of the brushes.
- Reinstall the brushes: Match the shape of the brush pegs with the shape of the brush icons in the cleaning head module and reinstall the brushes.
- Remove debris from the vacuum path: Remove the bin from the robot and clear any debris from the vacuum path. For optimal suction and agitation, replace your brushes regularly.
4. Step-by-Step Guide to Changing the Edge Sweeping Brush
This brush sweeps along the edges of the room
- Turn off the Roomba and flip it over: Ensure the Roomba is powered off before you begin. Place it upside down on a flat surface.
- Locate the edge sweeping brush: The edge sweeping brush is the small, three-armed brush located on the side of the Roomba.
- Remove the screw: Use a small Phillips head screwdriver to loosen and remove the screw holding the edge sweeping brush in place.
- Remove the brush: Gently pull the brush straight out.
- Install the new brush: Align the new brush with the screw hole and push it into place.
- Secure the brush: Use the screwdriver to tighten the screw, securing the new brush. If the edge-sweeping brush is worn out or missing bristles, replace it with a new one on Amazon to maintain edge cleaning performance.
5. Cleaning the Brush Cavity
After removing the brushes, take the opportunity to clean the brush cavity:
- Remove debris: Use a small brush or cleaning tool to remove any hair, dirt, or debris from the brush cavity.
- Wipe down the area: Wipe down the area with a clean, dry cloth to ensure no residue remains.
6. Troubleshooting Common Problems
- Brushes not spinning: If the brushes are not spinning after replacement, ensure they are properly installed and that no obstructions are preventing them from rotating.
- Roomba error messages: If you receive an error message related to the brushes, consult the Roomba’s manual or the iRobot website for troubleshooting steps.
- Noisy operation: If the Roomba is making unusual noises after brush replacement, check that the brushes are correctly aligned and that no parts are loose.
Roomba S9 Error Codes:
- Error 2: “Clean the brushes” (multi-surface rubber brushes cannot turn).
- Error 5: “Spin Roomba’s side wheels to clean” (side wheel is stuck).
- Error 10: “Spin Roomba’s side wheels to clean” (side wheels unable to spin).
7. Pro Tips for Brush Maintenance
- Regular Cleaning: Clean the brushes regularly, ideally after each cleaning session, to prevent the accumulation of hair and debris.
- Hair Removal: Use a brush cleaning tool or your fingers to remove tangled hair from the brushes.
- Replacement Schedule: Replace the brushes every 6-12 months, depending on usage and the amount of dirt and debris in your home.
8. Warnings and Best Practices
- Always turn off the Roomba before performing any maintenance.
- Use only genuine iRobot replacement brushes to ensure optimal performance and compatibility.
- Avoid using excessive force when removing or installing the brushes.
- If you encounter any difficulties, consult the Roomba’s manual or contact iRobot customer support for assistance.
FAQ
What happens if I don’t replace the brushes regularly?
If you don’t replace the brushes regularly, your Roomba s9’s cleaning performance will decline. Worn-out brushes are less effective at picking up dirt and debris, potentially leaving your floors dirty.
How often should I clean the Roomba s9 brushes?
It’s recommended to clean your Roomba s9 brushes at least once a week, or more frequently if you have pets or a lot of foot traffic in your home. Regular cleaning prevents the accumulation of hair and debris, ensuring optimal cleaning performance.
Can I wash the Roomba s9 brushes with water?
Yes, you can wash the Roomba s9 brushes with water. Remove the brushes from the Roomba and rinse them with warm water to remove any dirt or debris. Ensure the brushes are completely dry before reinstalling them in the Roomba. Some users recommend using a paper towel with water or a little Windex to clean the brushes.
What type of screwdriver do I need to replace the edge sweeping brush?
You’ll need a small Phillips head screwdriver to remove the screw holding the edge sweeping brush in place.
Where can I purchase replacement brushes for my Roomba s9?
You can purchase replacement brushes for your Roomba s9 from the iRobot website, authorized retailers, or online marketplaces like Amazon.
What should I do if my Roomba s9 is still not cleaning well after replacing the brushes?
If your Roomba s9 is still not cleaning well after replacing the brushes, there may be other issues affecting its performance. Check the filter and replace it if necessary. Also, inspect the vacuum path for any obstructions and ensure the Roomba’s sensors are clean. If the problem persists, contact iRobot customer support for further assistance.
Conclusion
Changing the brushes on your Roomba s9 is a straightforward maintenance task that can significantly improve its cleaning performance. By following these simple steps and tips, you can ensure your Roomba continues to keep your floors clean and dirt-free. Remember to clean the brushes regularly and replace them as needed to maintain optimal performance.