
Is your Roomba not picking up dirt and debris as effectively as it used to? The culprit could be dirty brushes. Over time, Roomba brushes accumulate hair, dust, and other debris, hindering their ability to clean your floors properly. Cleaning your Roomba’s brushes is an essential part of maintaining its performance and extending its lifespan. This comprehensive guide will walk you through the simple steps to clean your Roomba brushes, ensuring your robotic vacuum continues to keep your home spotless.
Cleaning your Roomba’s brushes is a quick and easy task that can significantly improve its cleaning performance. Neglecting this maintenance task can lead to reduced suction, inefficient cleaning, and even damage to your Roomba. By following this guide, you’ll learn how to disassemble, clean, and reassemble your Roomba’s brushes, keeping your floors clean and your robot vacuum running smoothly. Let’s dive in!
What You’ll Need to Clean Your Roomba Brushes
Before you begin, gather the necessary tools and materials:
- A small Phillips head screwdriver (or a coin for some models)
- A pair of scissors or a seam ripper
- A soft cloth or brush
- A vacuum cleaner (optional)
- Mild dish soap (optional)
- Warm water (optional)
Having these items on hand will make the cleaning process much more efficient.
Removing the Roomba Brushes
- Turn off your Roomba: Ensure your Roomba is powered off before you begin any maintenance.
- Locate the brush guard: This is the plastic cover that protects the brushes. It is usually located on the bottom of the Roomba.
- Remove the brush guard: Depending on your Roomba model, you may need to use a screwdriver or coin to remove the screws holding the brush guard in place. Some models have a simple release mechanism.
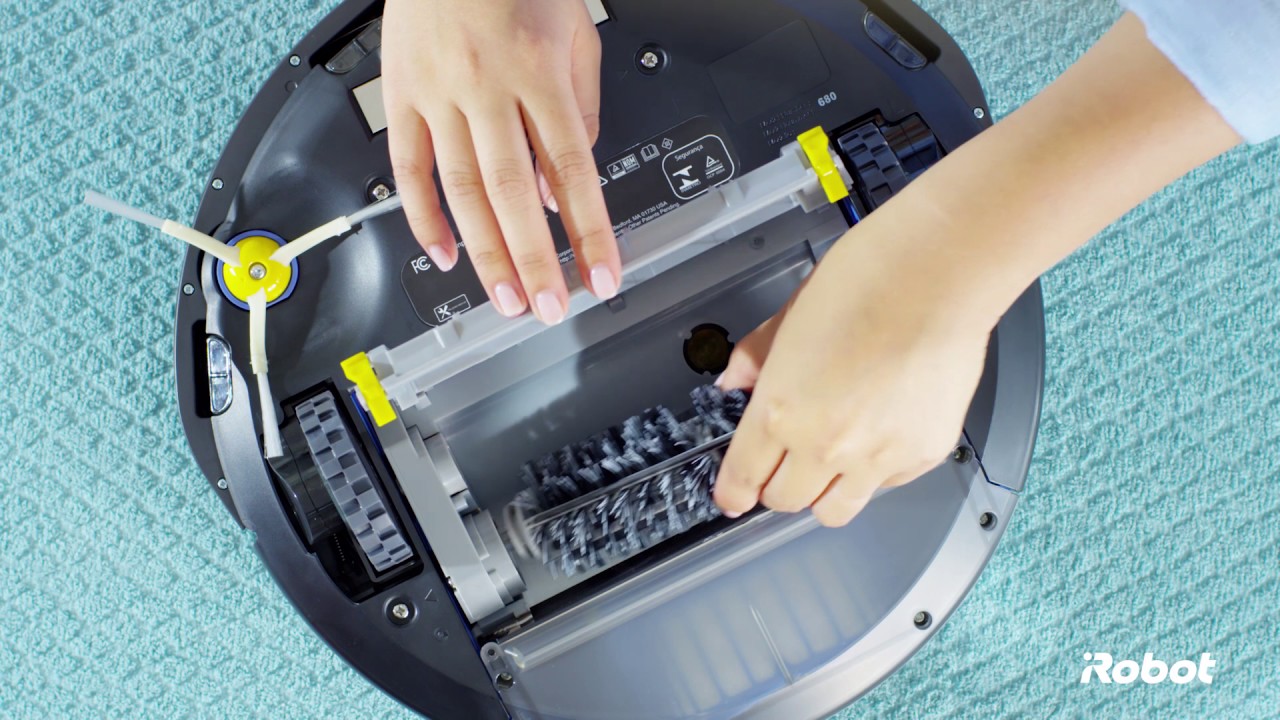
- Carefully remove the brushes: Once the brush guard is removed, you can lift out the brushes. Take note of how they are positioned to ensure you reassemble them correctly.
Cleaning the Main Brush
- Remove debris: Use your fingers, scissors, or a seam ripper to carefully remove hair, string, and other debris wrapped around the main brush. Be patient and persistent, as this can be a time-consuming process.
- Wipe down the brush: Use a soft cloth or brush to wipe down the entire surface of the main brush.
- Wash if necessary: If the brush is particularly dirty, you can wash it with mild dish soap and warm water. Rinse thoroughly and allow it to air dry completely before reassembling.
- Inspect the Brush Bearings: Check the brush bearings (the yellow plastic pieces at the ends of the brush). Remove any hair or debris that may be trapped inside. These bearings should spin freely.If the brush or bearings are worn or no longer moving smoothly, a replacement kit can quickly get your Roomba back in top shape.
Cleaning the Side Brush

- Remove the side brush: The side brush is typically held in place by a screw. Use a screwdriver to remove the screw and detach the brush.
- Remove debris: Similar to the main brush, remove any hair, string, or debris wrapped around the side brush.
- Wipe down the brush: Use a soft cloth or brush to wipe down the side brush.
- Straighten the bristles: If the bristles are bent or misshapen, gently bend them back into their original shape. You can also soak the brush in warm water to help reshape the bristles.If the bristles are frayed or won’t hold their shape, a replacement side brush will restore edge-cleaning performance.
Reassembling the Roomba Brushes
- Reinstall the main brush: Place the main brush back into its housing, ensuring it is properly aligned.
- Reinstall the side brush: Reattach the side brush with the screw. Make sure it is securely fastened.
- Reattach the brush guard: Replace the brush guard and secure it with the screws or release mechanism.
- Test your Roomba: Turn on your Roomba and run a cleaning cycle to ensure the brushes are functioning correctly.
Troubleshooting Common Issues
- Roomba not cleaning effectively after cleaning brushes: Ensure the brushes are properly installed and that there is no remaining debris. Check the vacuum motor and dustbin for any blockages.
- Roomba making strange noises after cleaning: This could be due to improperly installed brushes or debris trapped in the brush bearings. Disassemble and reassemble the brushes, ensuring everything is correctly positioned.
- Roomba brushes are damaged: If the brushes are worn or damaged, consider replacing them. Replacement brushes are readily available online and in stores.
- Roomba side brush not spinning: This could be due to hair or debris wrapped around the brush motor. Remove the side brush and clean the motor housing.
Pro Tips for Maintaining Your Roomba Brushes

- Clean your Roomba brushes regularly: Aim to clean your Roomba brushes at least once a month, or more frequently if you have pets or heavy foot traffic.
- Use a seam ripper: A seam ripper is an excellent tool for quickly and easily removing hair and string from the brushes.
- Replace brushes when needed: Over time, Roomba brushes will wear down and become less effective. Replace them every 6-12 months, depending on usage.
- Check for error messages: Pay attention to any error messages your Roomba displays, as they can often indicate a problem with the brushes or other components.
FAQ
How often should I clean my Roomba brushes to maintain optimal performance?
You should aim to clean your Roomba brushes at least once a month. If you have pets or a lot of foot traffic, consider cleaning them more frequently, such as every two weeks. Regular cleaning prevents the accumulation of hair and debris, ensuring your Roomba cleans efficiently.
Can I use any type of cleaning solution to wash my Roomba brushes, or is there a specific one recommended?
It’s best to use mild dish soap and warm water to wash your Roomba brushes. Avoid harsh chemicals or abrasive cleaners, as these can damage the bristles and other components. Ensure you rinse the brushes thoroughly and allow them to air dry completely before reassembling.
What’s the best way to remove tangled hair from the Roomba brushes, especially if it’s tightly wound?
Using a seam ripper or a pair of small, sharp scissors is the most effective way to remove tangled hair from Roomba brushes. Carefully slide the seam ripper or scissors under the hair and cut it away from the brush. Be patient and work in small sections to avoid damaging the brush.
How do I know when it’s time to replace my Roomba brushes instead of just cleaning them?
You should replace your Roomba brushes when they show signs of wear, such as frayed bristles, reduced flexibility, or visible damage. If cleaning the brushes doesn’t improve your Roomba’s cleaning performance, it’s likely time for a replacement. Generally, replace the brushes every 6-12 months, depending on usage.
Tips, Warnings, and Best Practices
- Always disconnect the Roomba from the power source before cleaning. This prevents accidental activation during maintenance.
- Avoid using excessive force when removing debris. This can damage the brushes and their components.
- Allow brushes to air dry completely before reassembling. Moisture can damage the Roomba’s internal components.
- Regularly check the Roomba’s filter and dustbin. Clean or replace them as needed to maintain optimal performance.
Conclusion
Cleaning your Roomba brushes is a simple yet crucial task that ensures your robotic vacuum continues to deliver exceptional cleaning performance. By following this step-by-step guide, you can easily remove accumulated debris, maintain your Roomba’s efficiency, and extend its lifespan.
Regular maintenance, including cleaning the Roomba brushes, not only keeps your floors clean but also protects your investment in your robotic cleaning companion. So, take a few minutes each month to clean those brushes and enjoy a consistently clean home. Now that you know how to clean Roomba brushes, go ahead and make your Roomba work like new!